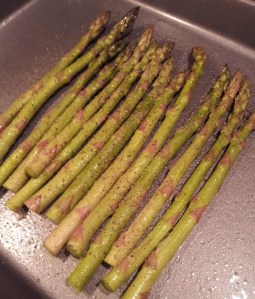
Roasted Parmesan Asparagus

Growing up, I hated mushy vegetables. Scratch that – I still hate mushy vegetables. Probably why I have never been a fan of lima beans. Sorry Mom!

But seriously, to this day I don’t like cooked carrots which (much to my dismay) are very popular in the South. You can call them cute names like “Copper Pennies” all you want, but I will still only put one or two on my plate (to be polite, of course), chew them as few times as possible, and chase them with something more appealing. Like wine.

Soups are the only reason for vegetables to be somewhat mushy. And obviously, I’ll grant a pardon to potatoes because, well, they’re potatoes and I enjoy them in all forms.

Now, asparagus to me always used to have that gross texture. You know, when you bit into it and it’s all slimy and stringy? Ick people.

However, I now love asparagus. Because I found a way to make it absolutely delectable and non-mushy – and from me to you dear friend, this might be the easiest recipe I ever share with you. So no excuses – it’s healthy and it’s delicious. Make it!
Roasted Parmesan Asparagus (serves 4 – 2 WW points per serving)

1 bunch asparagus

2 tsp. olive oil (I just use my Misto to spray it on)

1/4 tsp. salt

1/4 tsp. black pepper

4 Tbsp. shredded Parmesan cheese

Preheat oven to 400.

Snip off ends of asparagus (you can usually tell where to trim – it’s lighter in color).

Coat a baking sheet with non-stick spray and arrange asparagus in a side-by-side line.

Brush/spray with olive oil to lightly coat. Then sprinkle with salt and pepper.

Bake for 15 minutes. Then remove from oven and sprinkle with Parmesan. Return to oven for an additional 2-3 minutes until cheese has melted.

This goes great with anything – it’s amazing with fish or some delicious steaks – so divide, serve and devour!

Buffa-faux Chicken Tenders

Let’s flash back to the year 2010 for a moment, shall we?

– New Orleans won the Super Bowl

– The Oil Spill

– The Winter Olympics in Vancouver

– Auburn won the BCS National Championship

Now, somewhere in there, I decided to do WW to shed some pounds that desperately needed to go. But like I’ve said before, I love my food. I didn’t want to give up things I love because I knew that would make me an angry person. Deny me a burger and fries? I might punch you in the face.

But I learned quickly that by limiting portions and well, “bad” stuff like, well, almost anything fried – I could make it! So I started making turkey burgers with baked fries. Greasy calorie laden pizza? I made my own crust and used smarter toppings and reduced fat cheese.

Buffalo wings? Oh buffalo wings, how I love thee. Now I will say that sometimes, I still just need the real thing. But in 2010 I did find a way to make some delicious buffalo chicken tenders that are baked and also incredibly filling if you eat 4-5 of them. Definitely fond of the year 2010 – discovered baked buffalo wings. Oh, and got engaged. It was a good year.

So anyways, I know one of the ingredients sounds a little crazy, but it’s actually pretty delicious. You should totally try it.

Buffa-Faux Chicken Tenders (serves 2 – 11 WW pts. per serving)

10 chicken tenders

1/2 cup reduced-fat buttermilk (Doesn’t all really “count” since you end up pouring out the excess)

1 tsp. Tabasco

1/2 tsp. minced garlic

1 1/2 cups ground Fiber One cereal

1 tsp. onion powder

1 tsp. garlic salt

1/2 tsp. smoked paprika

1/2 tsp. salt

1/3 cup Frank’s Red Hot Sauce

1 Tbsp. reduced-calorie margarine

1/2 Tbsp. honey

Olive oil spray

In a medium bowl or deep dish, pour in buttermilk and whisk with Tabasco and garlic. Add trimmed chicken tenders and let soak at least 1 hour. Best if they have 2+ to really marinate!

Grind your cereal and set in a large shallow dish. Add your onion powder, garlic salt, paprika and salt. Mix until well combined.

Preheat your oven to 400. Line a cookie sheet with foil and place a baking rack on top. Spray rack with non-stick spray. This isn’t necessary, but it allows the chicken to get a little crispier.

Have your chicken, coating and baking rack set up in an assembly line and begin!

Pick up chicken and let excess buttermilk drip. Place in the dish with the crumb mixture.

Toss, roll, and press the mixture into the chicken. Then place on your baking rack. Repeat with remaining chicken. Spray the chicken with a little olive oil to crisp it up.

Bake for 10-12 minutes, then remove from oven, flip chicken, and bake another 10-12 minutes until cooked through.

While chicken is baking, add your hot sauce and margarine to a small saucepan and head over medium-low heat. Whisk until blended. I added about 1/2 Tbsp. honey to cut the heat a little!

When your chicken is cooked, add to a plate and drizzle hot sauce over the tenders. It absorbs quickly – but it is quite delicious!

And this, my friends, is what really got me hooked on playing with recipes to make them healthy but still allowing me to eat my favorite foods…great when paired with my ranch flavored oven-baked fries!

Happy Friday everybody!

Pink Vanilla Popcorn

So for those of you who know me, you might know how much I love entertaining! Yes, I run around like a chicken with my head cut off leading up to the party/dinner/event – but I love every single second of it! I love figuring out the theme, the menu, the decor and it makes me so happy to see everything come together and have all of the guests enjoying themselves!

This past weekend, I headed down to Destin, Florida to play hostess for one of my best friend’s bachelorette parties. The theme – pink and sparkles, the bride-to-be’s favorite things in the world! Seriously, she opens her suitcase everything inside is pink and/or glittery!

For weeks, I scoured my cooking magazines, my recipe box and Pinterest to come up with the perfect items to make. I searched for fun things for her to wear and for some fun things for the rest of the crew (like pink glow in the dark cups for going out!). I decorated the condo with some fun pink, black and sparkly stuff – but a lot of stuff was concealed until the surprise shower!

So after lunch on Friday the plan was to get some sun at the beach and then head in around 4 for the shower. Well, mother nature had other plans and decided to literally rain on our parade – so we pushed things up a bit – so I made Jen hide in a bedroom so we could set up!

A pink satin piece of fabric covered the refreshment table and was scattered with black, pink and clear rhinestones. I made butter cake cupcakes with pink cream cheese frosting (with silver sparkles of course) and just cut some watermelon to  put on a platter with blackberries and raspberries for more of the black and pink theme. I also made a delicious Watermelon Honeysuckle Spritzer to drink (and, well, it was pink!).

I also found a cute shop on Etsy that does handmade soaps! I got lingerie shaped ones that were wedding cake scented – and had them individually wrapped and labeled as favors for the girls.

I was horrible about taking photos of the cooking process (I woke up at 5:30am, drove 4 hours and was on the go until the guests arrived!) but my darling friends did manage to capture some of the set-up – including the yummy recipe I will share with you today!

Pink Vanilla Popcorn (serves 8-10)

3 bags light microwave popcorn

8 oz. good-quality vanilla melting wafers (I purchase mine at a local baking supply store)

Red food coloring (or color of choice)

Silver sprinkles

Heat water in a double boiler to medium heat and reduce to medium low. You do not want the water to boil.

Add 8 oz. of the wafers to the double boiler. Let sit for a few minutes until the wafers start to soften. Using a rubber spatula, stir wafers around until melting.

In the meantime, cook your popcorn in the microwave. If you are like me – it is very difficult not to eat half of it right away! Remove any kernels that were not popped.

Add popcorn to a large bowl or a cookie sheet.

When your wafers have melted, reduce heat to low and be careful not to stir too much or it will thicken. Add a few drops of food coloring and stir until blended. You can always add more – but you can’t take away, so  just add small amounts until you get to your desired color!

Remove melted wafers from heat and add a few dollops at a time to popcorn, stirring to coat the popcorn with your hands (I know it’s messy, but trust me – it’s easier!) and repeat until all of the popcorn has been coated.

Spread into a thin layer on wax paper and dust with sprinkles. Let cool at least 1 hour. Break apart and store in air-tight container until ready to serve!

It’s the perfect blend of salty and sweet and it’s super easy to customize for a party since you can make it in whatever colors you want! Perfect for the rapidly approaching football season, or just for a weekend with your best girl friends…

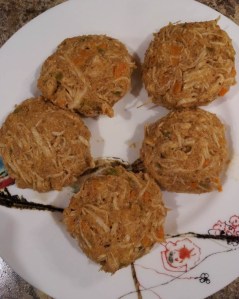
Chipotle Chicken Croquettes

Okay, I am officially running around like a crazy person this week getting ready for one of my best friend’s bachelorette parties this weekend! I’m so excited to get a weekend with my girls – and I’m sure I’ll have some fun things to share with y’all when I return!

So when I find myself super stressed out, for some reason, I turn to the kitchen. I recall one time in college I gave up sweets and caffeine around Valentine’s Day. Not to cut back on calories, but to prepare my body for a 48-hour dance marathon! Well, I got super stressed out and turned to baking. Yes, that thing I have a love/hate relationship with. I made a ton of cookies, peanut butter and chocolate rice crispy treats, brownies and another type of cookie. Luckily we had male neighbors in our apartment building…so home-baked treats were easy to pawn off on them!

The other day, I went for something more practical and good for me so I wouldn’t be extra stressed trying to shed pounds from eating a bucket of baked goods! I had written down a recipe a while back that I ran across on a fabulous website (she also does WW recipes!) and so with a big ole chicken breast thawed, I decided to try a new recipe for dinner.

Chipotle Chicken Croquettes (Serves 2 – slightly modified from “Eat Yourself Skinny“)

1 Tbsp. reduced-calorie margarine

2 1/2 Tbsp. minced orange bell pepper

2 1/2 Tbsp. minced green bell pepper

2 1/2 Tbsp. minced onion

1 1/2 cups cooked chicken (I just used 1 big chicken breast I had, about 8-10oz.)

3/4 cup panko breadcrumbs

1/4 cup light mayonnaise

1 egg, lightly beaten

1 Tbsp. Chipotle mustard

1/2 Tbsp. Worcestershire sauce

1/2 tsp. chipotle powder

1/2 tsp. seasoned salt

Spicy Mustard Sauce

1/2 clove minced garlic

1/4 cup light mayonnaise

1/4 fat-free sour cream

1/2 Tbsp. Chipotle mustard

1/2 Tbsp. lime juice

1/2 tsp. chipotle powder

About 1-2 hours before you’re ready to eat, whisk together garlic, mayo, sour cream, mustard, lime juice and chipotle powder until smooth. Refrigerate for 1-2 hours.

Bring a medium pot of water to a boil and add the chicken. Reduce to medium-high and cook 15-20 minutes until chicken is cooked through. While chicken is cooking, go ahead and chop your veggies. Saute them in 1/2 Tbsp. margarine.

In a small bowl, mix together mayonnaise, egg, mustard, Worcestershire, chipotle seasoning and salt.

Once your chicken has cooked and cooled, chop and shred. Add to a medium bowl with bread crumbs and add your sautéed veggies and combine.

Take the small bowl with the mayo/mustard mixture and add to the chicken. Combine with hands until blended and form into 5 patties.

Heat remaining 1/2 Tbsp. margarine in a skillet and cook the patties over medium heat for 3-5 minutes on each side. Serve with a dollop (or more if you desire!) of the spicy mustard sauce and dig in!

Note that this is probably a great appetizer, but I tested it for dinner and 2 1/2 patties was a great portion…

Potatoes Romanoff

I absolutely love potatoes. As I mentioned in a post about what I eat when I’m not cooking my more semi-elaborate meals, a baked potato is my favorite standby.

I also love the Olympics. Twice this week I’ve sat down with the computer with every intention of giving you a delicious recipe to try, and twice this week I’ve gotten sucked in as soon as Bob Costas starts giving his re-cap. I’m a little sad that it’ll be over on Sunday, but at least I will get my life back. Who knew women’s handball and BMX semifinals could be so enthralling?

So since I’ve been non-existent this week, I figured I owed you a really yummy recipe. This recipe does need some advanced prep work, but I promise you friends, it totally pays off – in taste and in grating so much you might build some good muscle tone! (It also makes a lot, so you will probably get to enjoy leftovers unless you have a really big crowd!).

Potatoes Romanoff (Serves 10 / 4 WW pts. per serving)

3 medium russet potatoes

3/4 cup minced shallot

8 oz. reduced fat white cheddar (I used Cabot)

2 tsp. salt

1/2 tsp. black pepper

1 1/2 cups fat-free sour cream

Preheat your oven to 425. Scrub and dry potatoes. Wrap in foil and bake for 1 hour and 15 minutes. Let potatoes cool – you can use the freezer or refrigerator to speed up that process if you’re running a little short on time!

While potatoes are baking, mince your shallots and grate your cheese.

When potatoes are cool enough to handle, grate into a large bowl. I leave skins on as much as I can to give it a little texture, but sometimes it starts coming off in big pieces so I just discard those.

Add sour cream, half of your cheese, shallots and salt and pepper. I usually end up adding a little more salt since there is a lot of potato to season!

Gently mix with a rubber spatula or your hands so you don’t end up “mashing” the grated potato (this is why you let it cool – if it’s too warm, it mashes easier).

Place mixture in a lightly greased baking dish and top with remaining grated cheese.

Bake at 350 for 25-30 minutes and serve.

Seriously y’all, this is absolutely divine served with steaks – but I’m sure it’s great with anything…

Happy Friday everybody!


Buffalo Chicken Lasagna

My goodness, what a week it has been! First week back at work from vacation is usually rough…but things got very interesting!

So, I have 3 amazing and adorable nephews from my wonderful Biffer and bro-in-law. Well, my sister was scheduled to be induced for baby #4 on Thursday, which was frustrating because she has ALWAYS wanted the movie moment of going into labor! She has tried everything – even got a ticket on her way to get spicy food for baby #3!

Monday she came over to drop off some garage sale stuff and was then en route to get the spiciest dish at her favorite Chinese restaurant. I offered to take her to Wal-Mart if she wanted to test the “stress induces labor” theory. She declined, because she can’t stand the place.

However, I totally think it worked cause guess what happened Tuesday morning? She went into labor! And Tuesday afternoon, my precious baby nephew #4 was born!

Proud Aunt moment:

Now, I won’t take full credit – as the spicy food probably had something to do with as well. So, I thought I’d share one of my new favorite spicy recipes with y’all on this Friday – and since it’s buffalo flavored, it obviously means good weekend food! It is also great for leftover lunches or dinners – serve with some bread or a crisp salad!

Buffalo Chicken Lasagna (Makes 8 servings / 7 WW pts. each)

1 pound chicken breast, raw

3 cups spaghetti sauce (Ragu light)

1 1/2 cups Frank’s Red Hot sauce (this is spicy – so use less if you are hesitant about spice!)

1 1/4 cups water

1/2 cup chopped celery

15 oz. reduced-fat ricotta cheese

1/2 cup egg beaters

1 Tbsp. ranch seasoning

1/2 cup reduced-fat blue cheese crumbles

10-12 pieces whole wheat lasagna

Preheat oven to 350 and lightly grease a 9×13 baking dish.

Cook chicken (either boil or bake) and shred.

In a small bowl, mix together ricotta cheese, egg beaters and ranch seasoning.

In a medium bowl, mix together spaghetti sauce, hot sauce, water, celery and chicken.

Pour a small amount of the sauce in the baking dish. Layer with 3 1/2 pieces of lasagna. Spread with 1/3 ricotta cheese and another layer of sauce. Repeat noodle, cheese, sauce until left with sauce on top.

Sprinkle blue cheese crumbles on top.

Cover with foil and bake for 1 hour. Remove foil and bake another 15 minutes…

Slice into 8 pieces…

And devour!

Happy Friday everybody, hope you have a great weekend!