Lightened up: Creamed Corn

I love living in the South.

There is just something about it. Laid-back but high energy. Sweet and sincere with a little bit of sass.

And the food. Ugh. The food is so freaking delicious it’s not even funny. Or fair. Particularly when you’re trying not to indulge in all of the amazing dishes offered. Especially in the lovely city of Memphis when on Fridays I can smell pork wafting down the street when I walk outside.

We are definitely known for some staples down here. BBQ. Fried Chicken. And quite frankly, when you’re in a restaurant serving either of those staples, you tend to find a lot of calorie-laden sides to accompany it. French fries. Fried pickles. Fried tomatoes. Mac and cheese. Creamed corn.

It’s almost like you don’t even have a fighting chance to be healthy.

Well, a few weeks ago I came across a recipe for creamed corn that sounded delicious – and actually not loaded with fat. Now I am picky about my sides – I can justify splurging a little on a main course, but I have to really be impressed by a side dish.

Plated - Creamed Corn

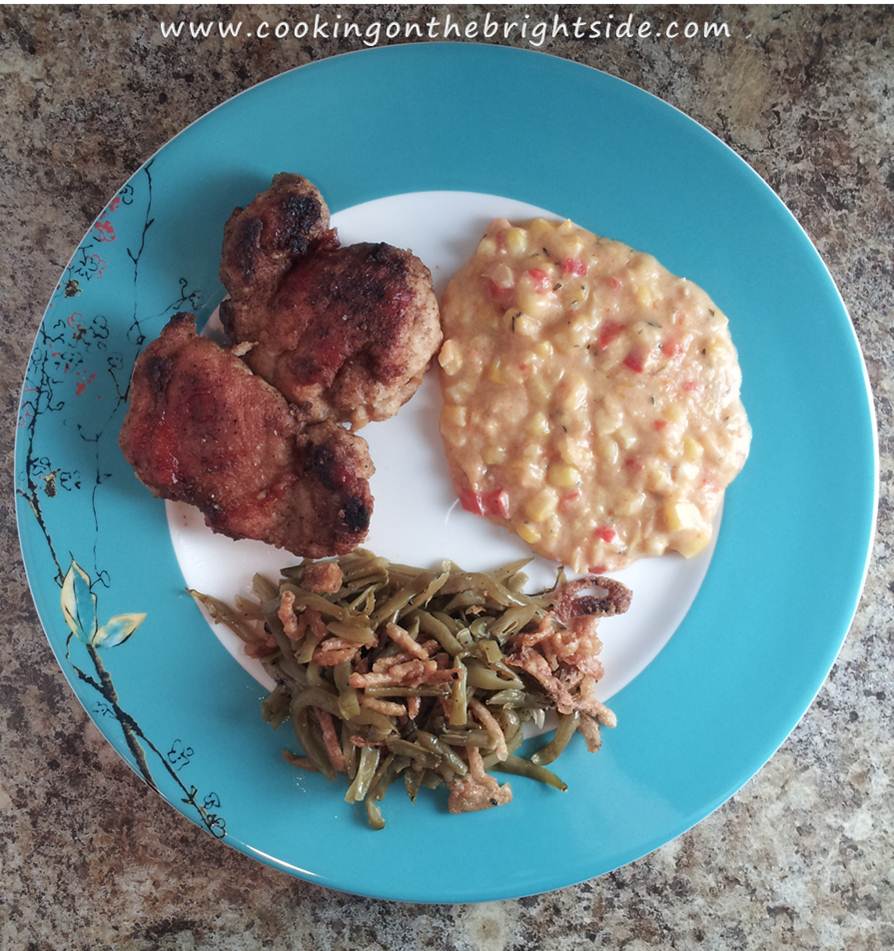
This is definitely one of those recipes. I’ve had creamed corn before – and it has just seemed bland. But the fresh herbs and  red peppers really jazz up this recipe.

Give it a try – we are definitely fans and have made it a few times already.

Lightened up: Creamed Corn (Serves 2 – 4 WW points each)

Slightly modified from original recipe found here.

1/2 Tbsp. butter (the real deal y’all)

1/4 cup red bell pepper, chopped

1 Tbsp. fresh thyme, chopped

1 cup frozen corn kernels, thawed

1/2 cup fat-free milk

1/2 Tbsp. white whole wheat flour

1/4 tsp. kosher salt

Step by Step - Creamed Corn

Melt your butter in a small saucepan. Add bell pepper and thyme and saute 2-3 minutes. Add corn kernels and stir to coat. Whisk in milk, salt and flour. Cover and bring to a boil, reduce heat to medium-low and simmer 10 minutes. Remove half of the corn mixture and add to a mini food processor, pulsing a few times. Return to saucepan and stir well, simmering another minute or so.

I served this with another Cooking Light recipe for pan-fried chicken thighs – a first for me. It was absolutely delicious and I didn’t feel the least bit guilty after licking my plate.

Lightened Up - Creamed Corn

Have a great weekend y’all!

Lightened Up: Green Bean and Corn Casserole

Um, did everybody know that Christmas is 4 days away? I wish somebody would have told me – I’ve just been assuming I have plenty of time! I guess that’s why the husband and I spent a few hours wrapping gifts last night…but at least we had A Charlie Brown Christmas and Rudolph The Red-Nosed Reindeer to keep us company and get us me in the Christmas spirit!

So now that the shopping is completely almost done, it’s time to focus on the food – not that I haven’t been focusing on food for the past month, but you know, food for Christmas day!

I think we all know that it’s okay to give in a little since “it’s the holidays” and all – but if you can still make something tasty and the recipe doesn’t start with 2 sticks of butter, then why  not save yourself a few calories to use on something sweet or a festive cocktail?

So here’s a recipe that’s been floating around my family for a while now – but I found a way to lighten it up and make it WW friendly! It seems like a lot of ingredients, but it’s super easy to throw together. (Fair warning – I made a double batch to take to a work potluck – so do not be deceived by the pictures!)

Green Bean and Corn Casserole (Serves 8 – 4 WW pts. per serving)

Ingredients

1 can ( 15 oz.) french cut green beans

1 can (11 oz.) white shoepeg corn

1 can (10.5oz) condensed cream of celery soup, reduced-fat

1 cup sour cream, fat-free

1/2 cup shredded cheddar cheese, fat-free

3 medium ribs of celery, chopped

1 small onion, chopped

1/2 tsp. salt

1/2 tsp. black pepper

“I Can’t Believe It’s Not Butter” spray

Preheat oven to 350.

In a medium bowl, add your chopped onion and celery.

Chopped Veggies

Drain green beans and corn and add to the bowl. Then add salt, pepper, sour cream, soup and shredded cheese. Mix until blended.

Sour Cream and CheeseMix

Pour mixture into a lightly greased casserole dish. Top with corn flakes and spray with butter spray. (The original recipe calls for crushed Ritz crackers, 4 Tbsp. melted butter and sliced almonds – but beware added points!).

Topping

Bake, uncovered, for 40 minutes until bubbling. Let rest 5 minutes and serve.

Baked

Also, if you have a party to attend or just want something healthier to snack on between big meals – might I suggest an adorable Christmas tree vegetable tray that I made (inspired, of course, by Pinterest!) last weekend for our party. It was quite the hit…

Veggie Tree

I hope you all have a very Merry Christmas and get to spend some quality time with friends and family!

Roasted Parmesan Asparagus

Growing up, I hated mushy vegetables. Scratch that – I still hate mushy vegetables. Probably why I have never been a fan of lima beans. Sorry Mom!

But seriously, to this day I don’t like cooked carrots which (much to my dismay) are very popular in the South. You can call them cute names like “Copper Pennies” all you want, but I will still only put one or two on my plate (to be polite, of course), chew them as few times as possible, and chase them with something more appealing. Like wine.

Soups are the only reason for vegetables to be somewhat mushy. And obviously, I’ll grant a pardon to potatoes because, well, they’re potatoes and I enjoy them in all forms.

Now, asparagus to me always used to have that gross texture. You know, when you bit into it and it’s all slimy and stringy? Ick people.

However, I now love asparagus. Because I found a way to make it absolutely delectable and non-mushy – and from me to you dear friend, this might be the easiest recipe I ever share with you. So no excuses – it’s healthy and it’s delicious. Make it!
Roasted Parmesan Asparagus (serves 4 – 2 WW points per serving)

1 bunch asparagus

2 tsp. olive oil (I just use my Misto to spray it on)

1/4 tsp. salt

1/4 tsp. black pepper

4 Tbsp. shredded Parmesan cheese

Preheat oven to 400.

Snip off ends of asparagus (you can usually tell where to trim – it’s lighter in color).

Coat a baking sheet with non-stick spray and arrange asparagus in a side-by-side line.

Brush/spray with olive oil to lightly coat. Then sprinkle with salt and pepper.

Bake for 15 minutes. Then remove from oven and sprinkle with Parmesan. Return to oven for an additional 2-3 minutes until cheese has melted.

This goes great with anything – it’s amazing with fish or some delicious steaks – so divide, serve and devour!

Spaghetti Squash Au Gratin

The word of the day is exhaustion!

It’s NBA playoff time and my Memphis Grizzlies are in the middle of a series with the L.A. Clippers. The game Monday night ended up starting at about 7:40 L.A. time…which means it was 9:40 here. Oh, and it went into overtime. Which means yours truly finally went to bed (feeling very depressed after a loss) around 1 a.m.

Coffee was a necessity Tuesday morning. Even more so than usual.

So I’m fading right now (as I write this Tuesday evening) and the sun isn’t even down yet – but have no fear, I have a delicious and diet-friendly recipe to share with you!

Have you ever used spaghetti squash? It’s kind of awesome. You cook it – and it smells awesome. But then you just scrape at it with a fork and it shreds into strands that look like spaghetti.

Soooo I mixed mine with onions, sour cream and cheese and called it a main dish. It was “Meatless Monday” in our house – and man, was it delicious!

Spaghetti Squash Au Gratin (Serves 2-4)

1 medium spaghetti squash

1/3 cup chopped onion

1 Tbsp. margarine

1/2 tsp. dried thyme

1/4 tsp. red pepper flakes

1/2 tsp. minced garlic

1/4 tsp. salt

1/4 tsp. black pepper

1/4 tsp. garlic salt

1/2 cup fat-free sour cream

2/3 cup fat-free shredded cheddar cheese

Heat oven to 375.

Using a very sharp knife, cut spaghetti squash in half. I start on one side, gradually working my way down and around the squash until it comes apart. Scoop out seeds.


Sprinkle black pepper and garlic salt inside the flesh and place in a deep baking pan, flesh side down. Bake 20-25 minutes. Then flip and bake another 20 minutes until tender. Let cool.

While squash is baking, saute onions in margarine with garlic, thyme and red pepper flakes. Cook until tender. Set aside.

Now take your cooled squash and begin scraping the flesh with a fork – it will shred really easily. I got about 3 cups of shredded “spaghetti”. Add to a bowl lined with paper towels to absorb any excess moisture.

Remove paper towels – leaving squash. Add sour cream, onion mixture, 1/3 cup cheese and salt. Mix well.

Pour into a medium to large, lightly greased baking dish.

Top with remaining 1/3 cup cheddar cheese. Bake for 15-20 minutes until cheese has melted.

This would make a great side dish – but like I said, this was our dinner for “Meatless Monday” – so we dug in!

Since we were making a meal of it, I went ahead and added half a petite baguette and a glass of red wine.

Seriously, try it. You won’t be sorry!

Squash Boats

I love fresh produce. There is something about walking into a grocery store and surveying all of the yummy, crisp and bright fruits and vegetables. Often times I’ll have a list of things I know I need, but I leave the “produce” section of my list with a few T.B.D.spaces.

Obviously I like to go the store with a purpose…otherwise, I have a lot of fresh fruits vegetables that are not so appealing a week later. So I’ve kind of trained myself to only buy veggies for a week or so at a time. Meal planning has not been my forte in the past, but I have certainly gotten much better about it! I just think it’s fun to go in and see what looks fresh and imagine some delicious side dishes I can make or veggies I can throw into a main course to add some flavor and some color. Too much planning can be disappointing – sometimes the selection isn’t great or it’s completely out (I’ve had kale on my list multiple times and had to find a “plan B”).

Well, one of our absolute favorite side dishes (which is also incredibly WW friendly) involves a lot of vegetables! And cheese. And bacon. And butter. Okay, so I use the light versions of those three ingredients – but still, it’s amazing. These are also really easy to prepare ahead of time – and your guests (or spouse) will be thoroughly impressed with this fancy looking side dish!

Squash Boats (serves 4)

Pretend there is a red bell pepper here...and bacon. =)

2 medium to large yellow squash

1/2 cup chopped tomato

1/4 cup green bell pepper, diced

1/4 cup red bell pepper, diced

1/2 cup red onion, chopped

2 tsp. salt

1/2 tsp. white pepper

2 Tbsp. fat-free shredded Cheddar

2 slices turkey bacon

Butter spray

Bring a large pot of water to a boil and add squash. Cook 10-12 minutes.

Cut up your tomato, bell peppers and onion. Add cheese, salt and pepper. Mix and refrigerate until ready to use.

Cook bacon until crisp. Crumble and set aside.

Heat your oven to 350.

Slice squash in half. You may need to let it cool so that you don’t burn your hands! Scoop out the “flesh” (aka seeds and string).

Set hollowed squash halves in a lightly greased baking dish.

Add crumbled bacon to vegetable mixture. (I just ended up using some Bacon Bits). Spoon mixture into squash halves and spray with some butter spray.

Bake for 20 minutes, until cheese is melted and boats are heated through.

You can easily adapt these – I leave cheese off one or two when my sister is dining with me. I’m sure you can add some other veggies and make them your own! I made some cold ones a while back with avocado, cucumber, tomato, onion and a lime vinaigrette!

These are SO good for you that you can even make this into just 2 servings…nothing wrong with eating your veggies!

Thanks for reading!