Stuffed Italian Zucchini

I realize Father’s Day was like, so last month. However, today’s blog post is a special one or my Dad, or as I call him, my “Duddy.”

I cook a lot of things, and sometimes they sound appealing to people. Sometimes they don’t. My darling Biffer is so supportive of my blog endeavor, even though she hates a very major ingredient in a lot of my recipes – cheese.

So I was describing this particular dish the other day to my Dad, who is going to be a bachelor next week as my mom is traveling, and he told me I had to post it immediately. I think I actually heard the drool through the phone.

You see, my dad loves Italian foods. There’s an awesome Italian festival in Memphis every summer and if he decides to brave the heat (he’s what I call, “heat intolerant”) to attend, his trip is not complete without an Italian sausage and pepper sandwich.

As they say, the apple does not fall far from the tree – because as soon as I saw this recipe on Skinnytaste, I knew it had to happen in my kitchen. So I hope y’all enjoy this one as much as I think my dad will!

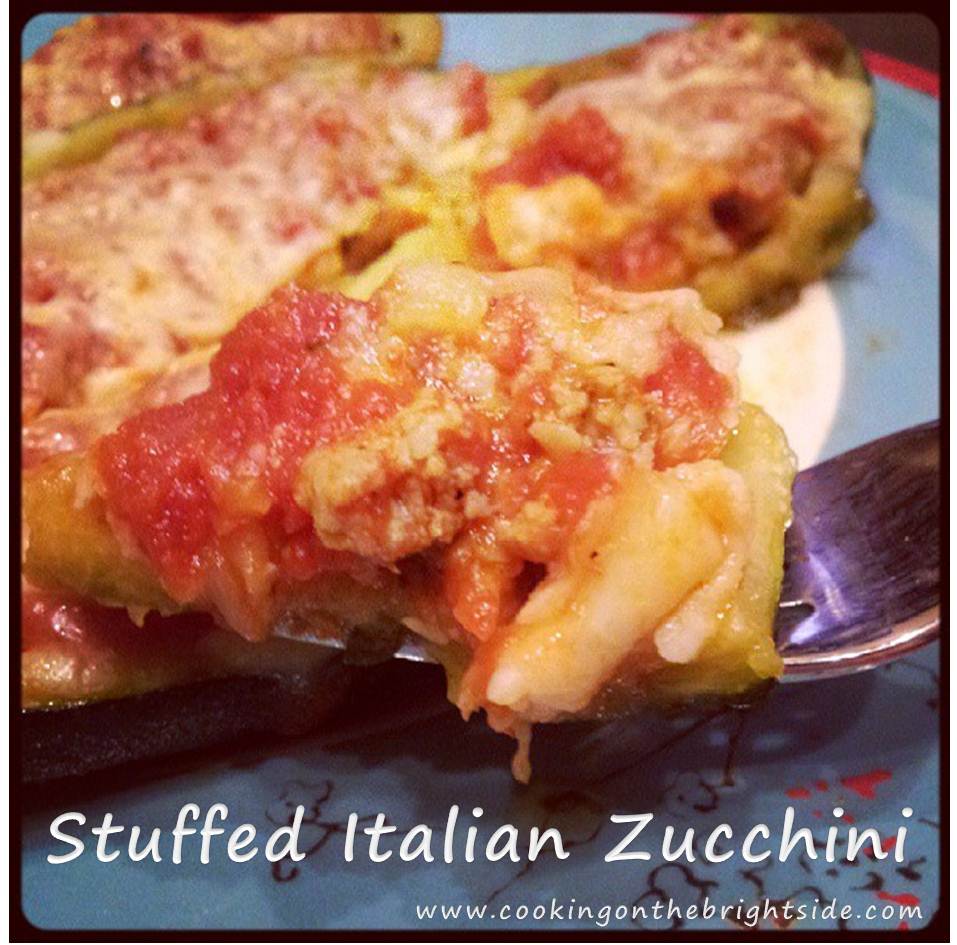
Stuffed Italian Zucchini (Makes 8 “boats” / 3 WW Pts. each)

Ingredients

4 medium zucchini

1/4 yellow onion, chopped

1/2 cup chopped red bell pepper

1 tsp. olive oil

1 1/2 tsp. minced garlic

1 1/2 cups marinara sauce

1/2 cup reduced-fat shredded mozzarella

2 links hot Italian turkey sausage (I use Butterball brand), cooked and crumbled

8 tsp. reduced fat Parmesan

Preheat oven to 400.

Bring a large pot of water to a boil.

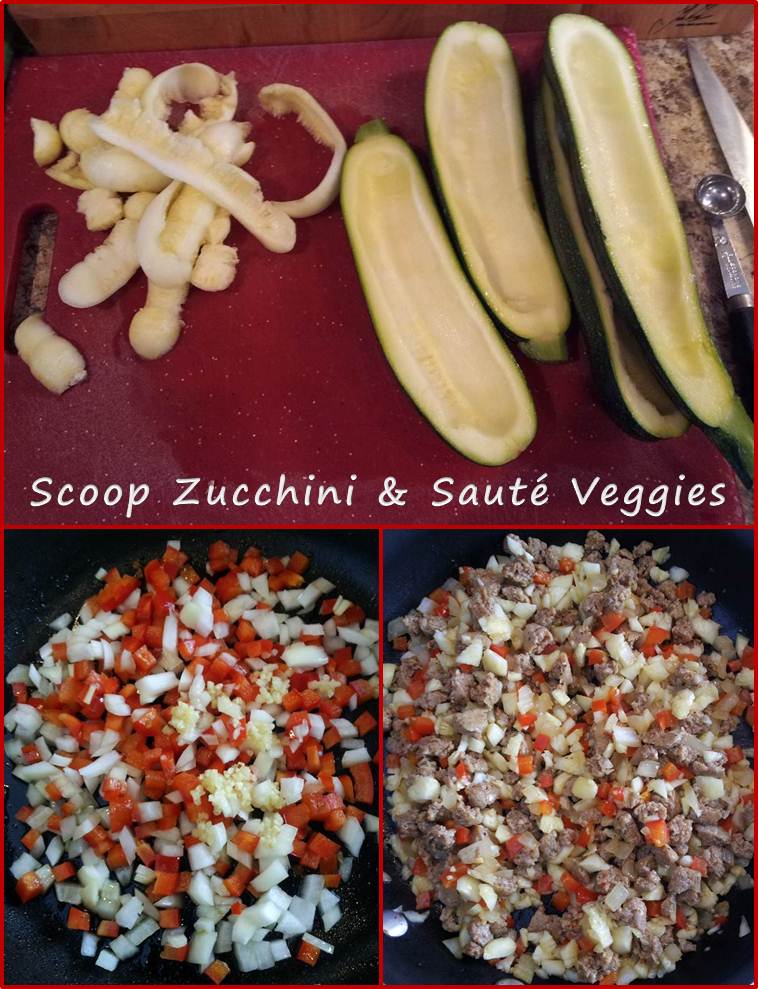
While everything is heating up, slice your zucchini in half and scoop out the insides, leaving a border about 1/8 – 1/4 inch think. Reserve about half of what you scoop out and chop it up.

In a medium skillet, heat olive oil. Add chopped bell pepper, onion and garlic. Saute 3-5 minutes. Then add zucchini, cooking another 2-3 minutes. Finally, add the sausage and and cook for 2-3 additional minutes.

Scoop and Saute

Place hollowed out zucchini halves in boiling water for about 1 minute each.

In a large baking dish, pour a light layer of marinara sauce on the bottom. Arrange boiled zucchini halves on top of sauce. Distribute the sausage-veggie mixture in the zucchini. Then top with marinara sauce (about 2 Tbsp. per half). Add shredded mozzarella (about 1 Tbsp. per half) and grated Parmesan.

Stuff Top Bake

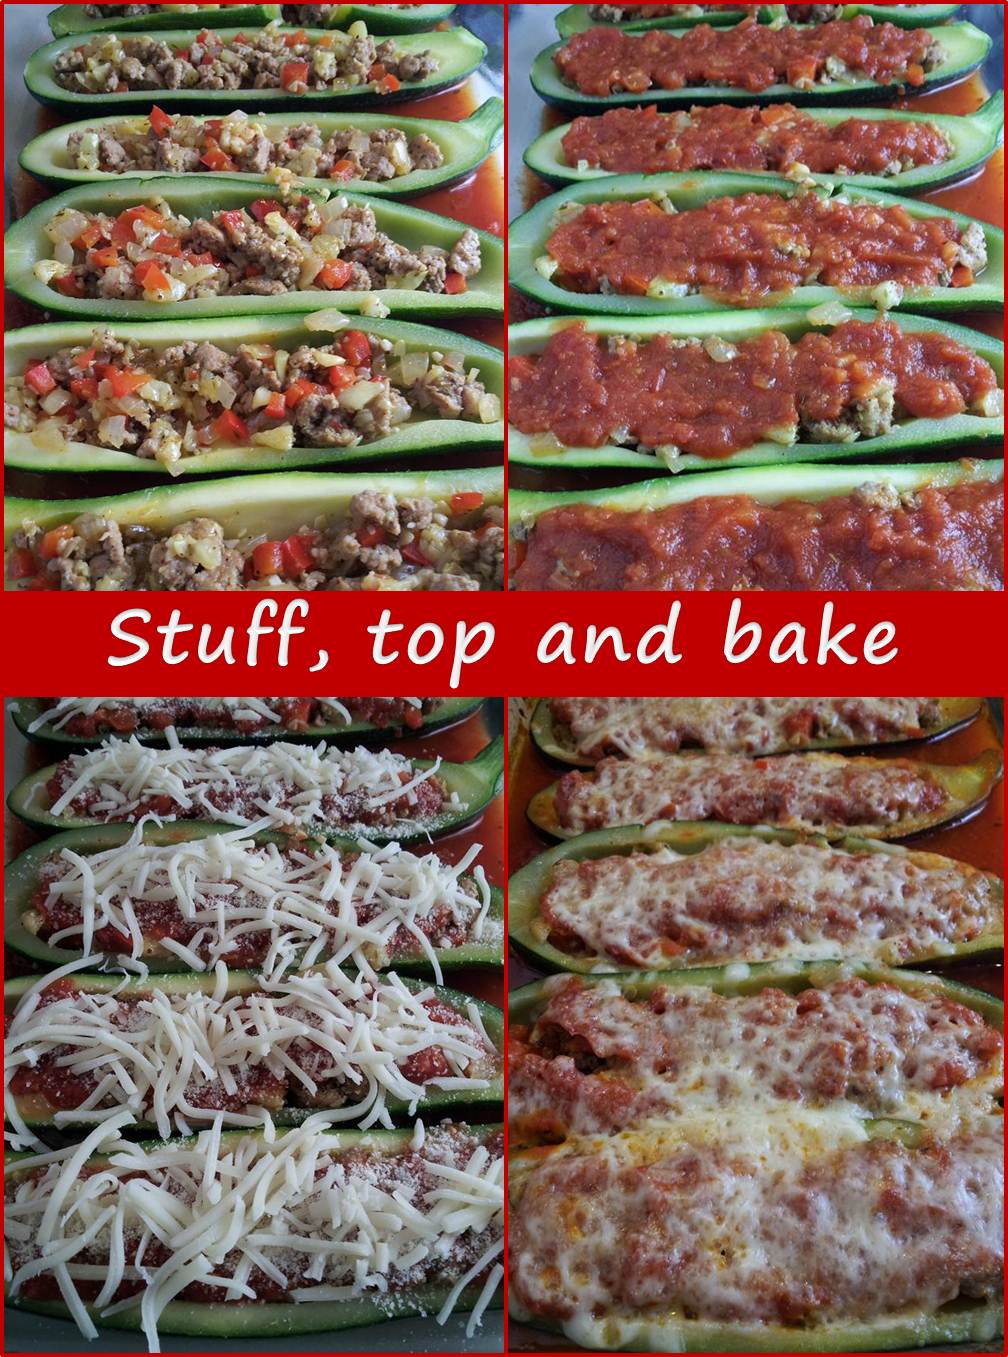
Cover with foil and bake for 30 minutes, until cheese is melted, zucchini is cooked through, and your kitchen smells amazing. How could it not – look at these babies!

Close up - Stuffed Zucchini

The husband and I each enjoyed 3 for dinner with some yummy french bread, and he took the remaining 2 for lunch the next day. However you divvy them up, I’m sure you will love them…

Stuffed Italian Zucchini

Hope y’all have a great weekend!

Buffalo Hummus

I know y’all have been worried about me.

I mean, there are likely several reasons you could worry about me.

My fear of balloons is a a cause of concern for some. My ability to get sucked in to a book and polish it off in a single day could raise eyebrows. Or how about the fact that whether I’ve watched the movie or tune in to the last 5 minutes, I can still break out into a straight-up ugly cry at the end of Rudy?

We haven’t even breached the subject of my bizarre talent of coming up with odd commercials, slogans or just ridiculous rhymes. Just ask my Biffer (whose latest blog post talks about the day she could have felt old) about the compilation I made for her as she went off to college. It was an epic combination of our favorite hits from the 80’s and 90’s, along with some of my super special commercials and jingles – and it was on a mixed tape. Let that one marinate for a while. Do cars even come with tape decks anymore?

All of that aside, I know you’ve been worried because it’s been almost two months since I’ve posted a buffalo chicken flavored recipe.

Today, we’re rectifying that issue. I made this recipe a few weeks ago as a bit of an experiment, and the husband and I went crazy for it! We both love hummus, and obviously you know about the buffalo obsession – so this was the perfect combination. It makes a ton so it was perfect for us to snack on throughout the week – give it a try and let me know what you think!

Buffalo Hummus (6 servings / 3 WW pts. each + chips, celery, etc.)

Ingredients

1 16 oz. can Garbanzo beans/Chickpeas (reserve 1-2 Tbsp. liquid, drain the rest)

2 tsp. minced garlic

1 Tbsp. olive oil

1 Tbsp. sesame oil

1-2 Tbsp. fresh lemon juice

1/2 tsp. smoked paprika

1/4 tsp. garlic salt

3 Tbsp. Frank’s Red Hot Sauce

1/4 cup reduced-fat blue cheese crumbles

I made hummus once before in college and for some reason forgot how easy it is. It makes good amount, doesn’t require much prep work and only leaves one dish to be cleaned. How awesome is that?

To begin, drain the chickpeas, reserving 1 or 2 tablespoons of the liquid. In a food processor (I use my precious mini one) add chickpeas and garlic. Pulse a few times to break everything up a little.

Next, add your oils, 1 Tbsp. chickpea liquid, hot sauce, lemon juice, paprika and garlic salt. Then chop on full speed, making sure everything is blending together. I rotated “chop” and “grind” a few times to switch up the direction of the blade to ensure the chickpeas were smoothing out a little.

Steps to Blend

Adjust seasoning to your taste buds. I played around with the paprika and garlic salt, and probably added another tablespoon of hot sauce to make sure we got the heat – so use the recipe above as a starting point and adjust. If it’s too thick, add a little more liquid/oil/hot sauce.

Scoop into a serving dish leaving a shallow well in center. Add blue cheese crumbles. Refrigerate at least 30 minutes before serving with pita chips, pretzel crisps, veggies (I recommend celery), etc.

Buffalo Hummus

Try making some this weekend or at your next gathering and watch people who normally scoff at hummus devour it!

Buffalo Hummus Close Up

Baked Tacos

Let’s be honest – there are few things worse than the first day back at the office after a wonderfully relaxing vacation. I mean, other than the first entire week back. Obvi.

Apologies for my lack of updates – after a fun-filled wedding weekend in Chicago, I was in full on survival-mode with vacation on the brain! The husband and I spent 8 days in South Carolina with my parents, enjoying all that Lake Keowee had to offer! We ate good food, drank good wine, watched movies (it rained a few days), played some tennis, hiked to a beautiful waterfall, soaked up sunshine when we could, read some books, and just had an overall amazing time.

SC WaterfallsLake Keowee South Carolina

Thanks to my parents for putting up with us for a week!

Anyways – aside from that first day catching up on e-mails and curling up in fetal position under your desk when you look at your completed to-do list, the other quite miserable thing  is the kitchen.

Like, why didn’t somebody stock my fridge for my return? Seriously, going to the grocery store can be exhausting when you’ve just spend 8 1/2 hours in a car singing along to the 80’s and 90’s XM stations at the top of your lungs much to the delight dismay of your husband.

Luckily, I had a few items to throw together one of our of new-found favorite meals which was perfect for our “Meatless Monday”. The husband always loves taco night, but this way is so easy because everything is ready at once and the filling doesn’t fall out everywhere!  Honestly, this one is a bit surprising for 2 reasons:

1 – My hubby loves it even when I use the “fake meat”

2 – I love it even though it has re-fried beans, which I usually make the hubby scoop out of the can because they gross me out so much.

So, if anything in this recipe doesn’t sound quite up your ally, just give it a try – I bet you’ll be pleasantly surprised!

Baked Tacos (Serves 2 / 10 pts. per serving)

Ingredients

6 Whole Grain Taco Shells (I use Ortega)

1 1/3 cup MorningStar Farms Meal Starters Veggie Crumbles (or ground turkey/chicken/beef of your choice, will affect WW point values)

1/4 cup chopped yellow onion

2 oz. canned tomato sauce

4 oz. fat-free re-fried beans

4 tsp. Taco seasoning (we use the “Hot and Spicy” mix – yum!)

2 oz. chopped green chiles, canned

1/2 cup reduced-fat shredded cheddar cheese

Toppings of your choice (salsa, lettuce, avocado, olives, sour cream, etc. – adjust point values accordingly!)

Preheat oven to 350. Add taco shells to a lightly greased baking pan so that shells are upright.

Heat a skillet to medium heat and add non-stick spray. Add veggie crumbles and cook 2-3 minutes, then add onions. Cook another 2-3 minutes before adding tomato sauce, chiles, re-fried beans and taco seasoning. Cook another 5 minutes over medium-low heat, stirring to combine and heat through.

Step by Step Tacos

Bake taco shells 2-3 minutes. Remove from oven and distribute the meat(less) mixture evenly in the shells, pressing down to the edges. Distribute the cheese evenly on top of the mixture. Return pan to oven and bake 10-12 minutes until cheese has melted and shells are baked.

Plated

Add toppings of your choice and devour. I usually go with salsa, lettuce, black olives and avocado – but I’m sure anything will be delicious…

Baked Tacos

Hope y’all have a great weekend!

A Major (for me) Milestone – My 100th Post!

So as my husband and I are off to galavant around the city of Chicago for a fun-filled wedding weekend, I realized I couldn’t leave y’all hanging without a delicious recipe for your weekend.

And then I noticed something. Something I couldn’t just leave alone.

Y’all, this is my 100th post! As in the 100th recipe or random thought I’ve shared with you.

So obviously, I had to make it a special one.

Well, recently I’ve had a major craving for seafood. Probably because it’s feeling like summer and I love fish during the summer. It’s just light and refreshing. However, I was wanting something a little more “special” that I could whip up for a special date night.

Holy moly people, did I find one! This would be a great recipe to make for a dinner party because it’s tasty, all of the elements take less than 15 minutes each…and it looks preeeeety.

So we’re celebrating a special occasion this weekend, I think you should too!

Sauteed Grouper with Shrimp Sauce (Serves 2 / 8 WW points per serving)

Ingredients

12-14 pieces asparagus, raw

olive oil, salt and pepper for asparagus

For Fish:

2 grouper fillets, 4-5 oz. each

Lemon pepper and garlic salt for sprinkling

2 Tbsp. white whole wheat flour

1/2 Tbsp. butter

1/2 lemon

1 1/2 Tbsp. Worcestershire

Cajun seasoning

For Sauce:

1/2 Tbsp. butter

2 Tbsp. yellow onion, diced

4 oz. artichoke hearts, chopped

1 Tbsp. white whole wheat flour

1/3 cup fat-free half and half

2 1/2 Tbsp. vermouth

2 1/2 oz. cooked shrimp, cut into about 3 pieces per shrimp

Begin by roasting your asparagus. Spray with olive oil, sprinkle with salt and pepper, and bake at 375 for 10-12 minutes. Set aside.

Preheat broiler to low. Sprinkle grouper fillets with lemon pepper and garlic salt, just a dusting on each side. Dredge fish in flour and coat well. Saute in butter for 3 minutes per side. Sprinkle with lemon juice, Worcestershire sauce and Cajun seasoning. Broil 5-7 minutes.

While the fish is cooking, go ahead and make your sauce. Melt the butter in a small saucepan over medium heat. Saute onion and artichokes for 3 minutes until softened. Stir in flour, half and half, and vermouth and whisk until thickened. Add the shrimp and cook another 2-3 minutes until shrimp is heated through.

Step by Step

Add the cooked asparagus to your plate. Top with a fillet of fish, and pour sauce over top.

Plated

I wasn’t sure what the asparagus would add at first, but it really give the flavor a new level – definitely make sure you have some in each bite…

Sauteed Grouper with Shrimp Sauce

Hope y’all have a great weekend!

Shrimp and Crab Dip

Do you ever come across a recipe and think “that looks so incredibly amazing I want to eat it all right now” and then you start reading the ingredients and kind of cringe at the mental calorie count?

For instance, when you see a recipe by a certain Southern baroness of butter, do you automatically cast it aside?

I often do – but recently, I found one I knew I could makeover into a tasty and lightened up dish!

Y’all may have caught on to the fact that I LOVE appetizers and finger foods. I’m talking I get excited when I throw a party and have leftovers because I can make meals of fingers foods the next day or two.

So last weekend during the golf tournament, it was time for a little shindig to kick off the festivities. I had come across this recipe and figured it was time to give it a try. I made a few adjustments – mainly reducing the fat content, but also adding a little flavor. I don’t like to toot my own horn or anything, but um, beep beep – cause this dip was delicious. I’m honestly wishing I had some in front of me right now.

The best part about dips is that they don’t require assembly after they cook, and this one is great for cookouts or fancier meals – so I’m sure it would go perfectly with whatever meal you have planned for Father’s Day! I served it with some blue corn tortilla chips and original flavor Pretzel Crisps, and it disappeared rather quickly.

Shrimp and Crab Dip (Serves 10 / 3 pts. per serving + chips/crackers/pretzels)

Original recipe “Shore is Good Seafood Dip” found here.

Ingredients

2 Tbsp. reduced-calorie margarine

1 green bell pepper, chopped

1 small yellow onion, chopped

2 medium ribs celery, chopped

1 6 oz. can lump crab meat

1 6 oz. can shrimp, roughly chopped

1/2 can of condensed Cream of Shrimp soup (use bottom half and discard top half)

1 cup fat-free mayonnaise

6 oz. reduced-fat Parmesan cheese

1/2 tsp. white pepper

1/2 tsp. Tabasco sauce

Preheat oven to 350.

In a large skillet, melt margarine over medium heat. Sauté bell pepper, onion and celery 5-7 minutes until softened.

In a large bowl, mix together crab, shrimp, mayonnaise, Parmesan, pepper and Tabasco. Add sautéed vegetables and stir until ingredients are blended well.

Step by Step

Pour mixture into a medium-large baking dish and bake for 30 minutes.

Baked Dip

Serve with crackers, chips, pretzels, vegetables, etc.

Seriously give this one a try at your next party – even if you’re the only guest!

ShrimpandCrabDip

Have a great weekend y’all, and happy Father’s Day to my “Duddy” and all of the other Daddies and Daddies-to-be out there!

Cola Glazed Grilled Chicken

It’s finally here.

It’s golf tournament weekend.

This weekend my fine city hosts the FedEx St. Jude Classic played at TPC Southwind, and I could not be more excited. Back in the day (pre-employment), I got to sit outside and enjoy 5 solid days of golf. Now, I’m a little more limited to the weekend, but man do I love every single second.

Now, some of you silly people think that Summer begins on June 21st. But in Memphis, it’s like reverse groundhog day – Summer starts 2 weeks early. Seriously, I can walk outside and stand there for 5 minutes and break into a sweat. I know, I’m amazed I’m married too.

So for me, this weekend brings seersucker and linen, a Pronto Pup date (or two) with my Biffer, the infamous “Hush Y’all” signs, cold beer, exciting golf…and, of course, the urge to break out the grill.

I know some people are intimidated by the grill, but I assure you, it’s so easy once you learn! Grilling is a great way to add a little extra flavor to anything, including this delicious recipe I came across via one of my favorite magazines, Cooking Light.

This weekend I urge you to get outdoors, fire up your grill, and throw together a delicious meal featuring this simple, smoky and sweet recipe!

Cola Glazed Grilled Chicken (Serves 2 / 5 WW pts. per serving)

Adapted from original recipe here.

Ingredients

3/4 tsp. canola oil

8 oz. chicken breasts (2 – 4oz. pieces)

1 Tbsp. minced onion

1/4 cup Coca-Cola

1 1/2 Tbsp. ketchup

1 tsp. cider vinegar

2 tsp. Worcestershire sauce

1/2 tsp. Chili powder

1 tsp. smoked Paprika

1/8 tsp. salt

1/8 tsp. ground cumin

Preheat grill to medium-high heat and spray with non-stick spray.

Heat a small saucepan to medium-high. Saute onion in oil for 2 minutes, then add garlic and cook an additional minute. Pour in Coke, ketchup, vinegar, Worcestershire and chili powder. Stir and bring to a boil, then reduce to medium heat and simmer 10-12 minutes. Stir occasionally until sauce thickens. Set aside 2 Tbsp. and use the rest on the grill.

StepbyStep

For the chicken, mix together sugar, salt, paprika and cumin and sprinkle over both sides. I sprinkled a little more paprika and cumin over the chicken to make sure it was thoroughly seasoned.

Add chicken to grill and baste with sauce. Turn after 3-4 minutes and base again. Repeat until sauce is gone and chicken is cooked through. (I use the thin chicken breasts – so they cook in under 10 minutes).

Plated

Plate the chicken and brush with remaining sauce. I grilled some corn on the cob with the chicken and made my delicious Parmesan and green bean casserole, and it all came together perfectly.

Cola Glazed Grilled Chicken

Hope y’all have a great weekend…I know I will!

Bistro Steak with Red Wine Sauce

If you haven’t noticed a theme the past few weeks from my blog – things have been crazy around here. At least, during the week. Hence the cheese fries and casseroles.

Nothing wrong with those foods, because, you know, they’re delicious. But sometimes it’s nice to have a special meal. You know, slow down the pace, sip on a glass of wine, not have to rush off anywhere or get the laundry folded?

I was grabbing some quick groceries at Target the other week and came across some “Laura’s Lean Beef” organic sirloin steaks. They were a pretty good price (about $6.00 – think what you’d pay at a restaurant!) and were vacuum sealed in their own juices so they looked super tender.

So I tested out this recipe and the verdict was: it’s pretty darn delicious! I’ve been known to scramble around a little when it’s time to eat, but this one is pretty simple with some prep work done ahead of time. I recommend an easy starch like rice or potatoes to soak up some of the delicious sauce…that’s just a necessity.

I must say, if time preparing a meal is not a luxury you have, but the time to savor one sounds like pure bliss – you should definitely give this one a try!

Bistro Steak with Red Wine Sauce (Serves 2 / 10 pts. per serving)

Ingredients

2 (6 oz.) sirloin steaks, trimmed of fat

1/2 Tbsp. canola oil

2 Tbsp. shallot, chopped

2 tsp. ground thyme

4 fl. oz. red wine

1/2 cup fat-free beef broth

1 tsp. Dijon mustard

1/2 Tbsp. dried parsley

1/2 tsp. salt

1/2 tsp. black pepper

1 Tbsp. butter

Heat oil in medium skillet over medium-high heat. Sprinkle steaks with 1/4 tsp. salt and pepper. Cook steaks in oil for 4-5 minutes on each side. Remove from heat and let rest 5 minutes.

Steak Collage

Saute shallots and thyme in remaining oil for 1 minute before adding wine. Cook 2-3 minutes until majority of liquid evaporates. Add beef broth and cook 5 minutes until liquid thickens and reduces by half. Whisk in remaining salt and pepper, and add butter and mustard.

Slice steak into strips across the grain and top with sauce. Sprinkle with parsley and serve…

Plated Steak


And don’t forget something to soak up all of that delicious sauce…

Bistro Steak

Hope y’all have a great weekend!

Buffalo Chicken Cheese Fries

Why is it that I can’t get enough of buffalo-chicken-flavored things?

Oh, right – because they’re awesome…

Buffalo Chicken Cheese Fries

I ordered something “buffalo-style” last week at lunch and my co-worker laughed and said “You seriously have an obsession with buffalo flavor don’t you?” Um, yes…have you read my blog?

Well, just when you thought I couldn’t possibly come up with another thing to layer with blue cheese, celery and hot sauce – I went and did it again.

With my Memphis Grizzlies in round 3 of the NBA Playoffs, it’s tough to want to make like, roasted fish with vegetables for dinner when a game is on – I need (faux) bar food!

So I’ve sliced up potatoes before to make my own cheese fries, but my Tuesday evening did not warrant that kind of effort after my workout. Then I remembered seeing a recipe on a blog I follow (“My Life as a Mrs.” check her out!) for buffalo cheese fries using frozen french fries, so I gave it a shot.

Excellent choice.

Y’all, these are so delicious – and I portioned it out to make sure it was enough food without being totally horrible for you! I’m sure they’d be a welcome addition to any party you are attending this holiday weekend!

Buffalo Chicken Cheese Fries (Serves 2 for a meal / 13 WW pts. per serving)

Slightly modified from original recipe found here.

Ingredients

10 oz. Alexia Waffle Cut Fries

1 cup shredded chicken breast (boneless and skinless)

1/3 cup Frank’s Red Hot sauce (+ about 2 Tbsp. for drizzling)

1/4 cup celery, chopped

1/3 cup reduced-fat blue cheese

1/3 cup reduced fat shredded cheddar

1 Tbsp. chopped green onion

2 Tbsp. fat-free Ranch (for dipping)

Heat your oven to 400. Layer fries on a baking sheet and bake according to directions.

Chop your veggies and mix your chicken with the hot sauce.

When fries are done baking, move them close together and top with chicken and celery. (I separated mine into 2 portions because the hubby was studying and wanted to eat later, so this portion is allll for me.) Then top with blue cheese crumbles and shredded cheddar.

Step by Step

Bake another 5 minutes, or until cheese has melted.

Sprinkle with additional hot sauce and add green onions and serve with ranch on the side for dipping.

Plated

I barely needed any ranch, as these were so full of flavor!

Bite - Buffalo Chicken Cheese Fries

Try it out if you’re a buffalo chicken freak  fan like me, or if you just want to try a new (and healthy!) twist on a classic.

Have a wonderful Memorial Day weekend everybody!


Cheeseburger Casserole

So I mentioned last week that I started a new workout program. While I knew it would be a challenge to get back into shape, holy cow I did not realize how much of a challenge it would be physically and mentally!

I blame myself of course. I mean, what did I expect – I haven’t exactly done anything along the lines of “fitness” since I had to fit into a wedding dress…and that was a year and a half ago!

Well, I’ve learned a few things with my new schedule, aside from the fact that sports bras are my friend. During the week, the two things I learned the hard way were A – eating dinner before working out isn’t ideal for me and B – cooking dinner after working out isn’t ideal for me. Quite the conundrum, right?

So how do I eat dinner after working out (so that I don’t feel it coming back up on high cardio days) without having to make dinner after working out (so I don’t writhe in pain when I lift a saucepan after doing a zillion push ups)?

Enter the wonderful world of casseroles. I’ve had a few written down and decided week 1 would be the perfect time to try them out. Thanks to one of my food blogs, Skinny Taste (also a big proponent of Weight Watchers!), this casserole suited all of my needs! Quick, easy, delicious and healthy – I made everything ahead of time and popped it in the oven after my workout while I cried in fetal position showered! You should definitely try this one…it was great for a meal paired with some Alexia House Cut Fries with Sea Salt.

Cheeseburger Casserole (Serves 6 / 6 WW points per serving)

Very slightly modified from original recipe here.

Ingredients

8 oz. lean ground beef (I used 93% lean)

1 tsp. olive oil

1/2 cup chopped yellow onion

1/2 Tbsp. minced garlic

1/2 tsp. salt

1/4 tsp. black pepper

1 Tbsp. tomato paste

1 (14 oz.) can diced tomatoes (I’d get petite if possible, lesson learned!)

2 Tbsp. Dijon mustard

3 oz. Ronzoni Healthy Harvest Whole Wheat Rotini Pasta

1 cup fat-free shredded cheddar cheese

1/4 cup dill pickles, chopped

Heat your oven to 350. Lightly grease a small casserole dish.

In a medium saucepan, bring water to a boil and cook pasta according to directions.

In a medium skillet, heat oil and cook onions for 3-5 minutes until softened. Add garlic and ground beef and cook through. Season with salt and pepper. Stir in tomato pasta, tomatoes and mustard. Let the mixture simmer slightly. Then add pasta and toss to coat.

StepbyStep

Add mixture to the casserole dish, spreading into an even layer. Top with shredded cheddar and bake 15-20 minutes. Let sit 5 minutes, add chopped pickles (only to one side if you have a family member who is a freak and doesn’t eat them) and serve.

Plated Casserole

Fries were great with this, but you could toast up a hamburger bun as a “roll” to eat on the side too! Gotta stick with the theme…

Cheeseburger Casserole

Hope y’all have a great weekend!

French Onion Style Salisbury Steak

Confession: I am like a little kid on Christmas morning when my magazines arrive in the mail each month.

They all usually come within a few days of each other, so I try to save them all up so I can scour the pages for tips on gardening (psh, right), decorating (eh, okay), shopping (heck yes) and of course, cooking (woot woot!).

So in addition to my Southern Living, Cooking Light, Food Network and Veranda magazines (don’t judge), I got a bonus one this month – and it’s full of recipes!

Okay, full is a bit of an exaggeration as it’s not a full-fledged 90-pager, but has anybody else received Cuisine at Home?

Well, I went ahead and sampled a recipe for y’all…slimming it down of course, because bathing suit season is upon us! I’ve even started a new workout program…if it doesn’t kill me, it is certainly going to make me stronger.

Now, I’ve never made or eaten salisbury steak, so I’m not sure what drew me into this particular recipe – but after eating it, it’s totally on the “make again” list. Hope you enjoy as much as we did!

French Onion Style Salisbury Steak (Serves 2 / 10 WW pts. per serving)

Ingredients

Adapted from original recipe here.

8 oz. ground beef (points based on 93% lean)

1/2 Tbsp. dried parsley

1 Tbsp. chopped scallions

1/2 tsp. kosher salt

1/4 tsp. black pepper

3/4 Tbsp. white whole wheat flour (+ 1/2 tsp. for later)

1/2 Tbsp. olive oil

1 cup yellow onion, sliced

1/2 tsp. sugar

1/2 Tbsp. minced garlic

1/2 Tbsp. tomato paste

1/2 tsp. dried thyme

1 cup beef broth

2 Tbsp. red wine

4 slices french baguette (I use the Target brand “Archer Farms” petite baguette

1 slice reduced-fat swiss cheese

2 Tbsp. shredded Parmesan cheese

“I Can’t Believe It’s Not Butter” spray

Heat oven to 350.

Begin by combining your ground beef, scallions, parsley, salt and pepper together. Form into to small patties. Dredge in flour.

Heat olive oil in a medium skillet. Add patties to skillet and saute over medium for 3-4 minutes on each side. Remove patties. Add onions and sugar to skillet and cook 4-5 minutes until tender. Stir in garlic and tomato paste and sprinkle with 1/2 tsp. flour. Add broth, wine and thyme and a little dash of salt. Stir until blended well. Return patties to the pan, reduce heat to medium low. Cover and simmer for 10 minutes until patties are cooked through.

Assembly

While the patties are cooking, get your cheese bread ready. Place baguettes on a baking sheet, spray with butter and sprinkle with garlic salt. Tear up swiss cheese slice and place on each slice, and sprinkle evenly with Parmesan. Bake 7-9 minutes until toast is crispy and cheese is melted.

Cheese

Add 2 slices of bread to a plate. Place a cooked Salisbury steak on top. Pour onion sauce mixture over each and serve.

FrenchOnionSalisburySteak

I served this with a side of mashed potatoes to soak up sauce and it was an excellent decision!

CloseupSalisburySteak

Hope y’all have a great weekend!