Whiskey-Glazed Cheeseburger

Right now Annie is stuck in my head. You know, how she’s always excited about tomorrow?

Well friends, I am BEYOND excited for tomorrow. Because tomorrow is my Christmas. That’s right – IT’S COLLEGE GAME DAY!

In order to celebrate this day accordingly, we’re going with a bit of a cheat meal. I know, I know – normally I give you delicacies that are cheating…without cheating. But I couldn’t resist. It was so delicious and I have been thinking about it since I made it. So let’s get down to it…

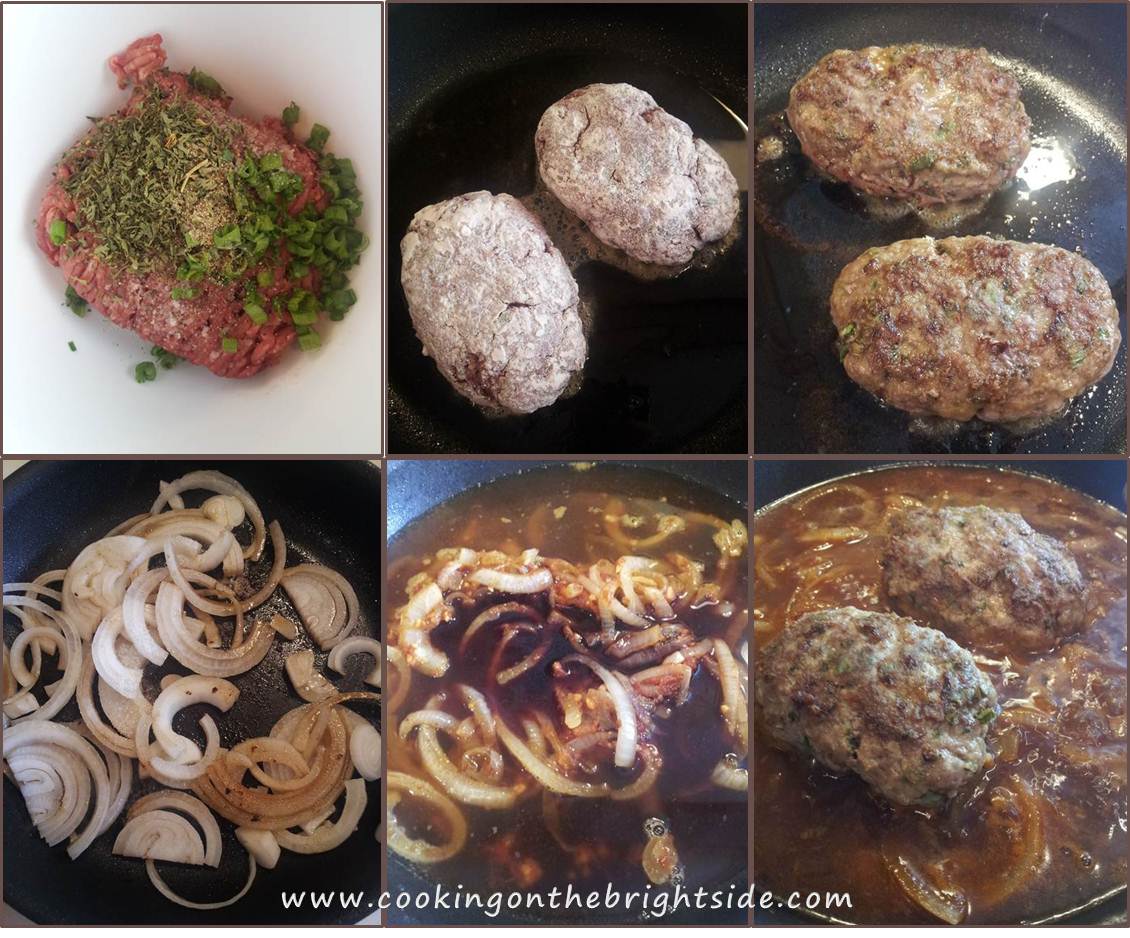
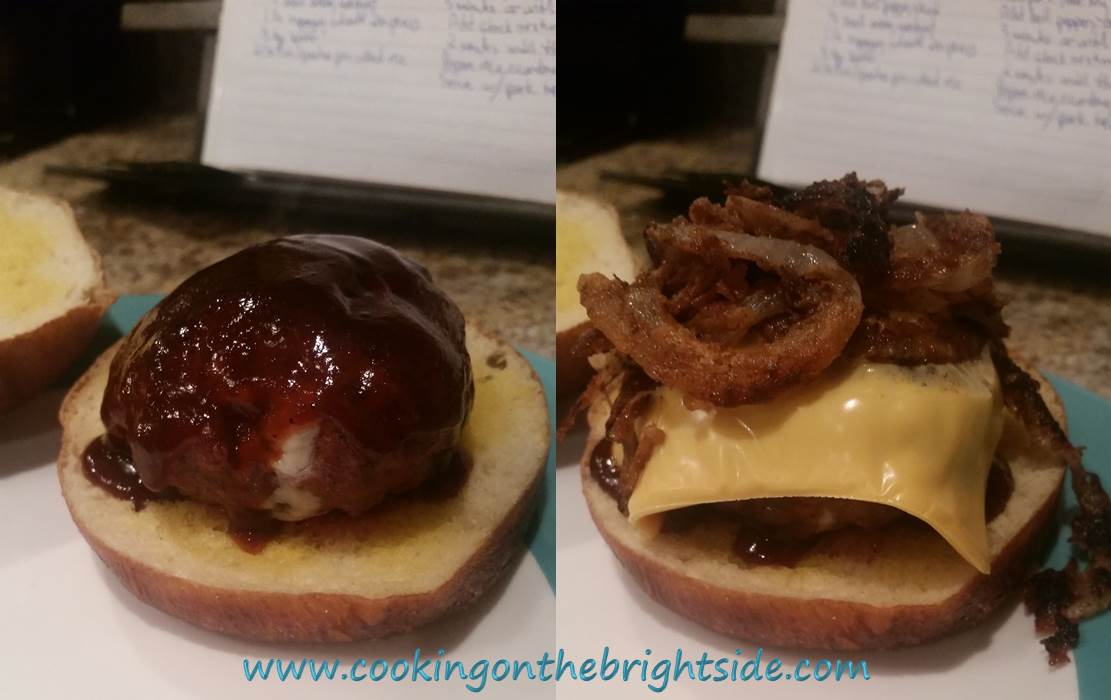
The burger itself is stuffed with blue cheese. I’ve thrown crumbles in the meat before, but this way there’s just a yummy, salty, cheesy center. Delicious by itself.

But then we add the whiskey glaze. I am not even a huge fan of whiskey, but it adds a ton of flavor – like a boozy, smoky barbecue sauce.

Then, you add the cheese. I just threw a slice on there because it just made life simpler and this burger was already rather ambitious for me. Because then you add the crispy onions. Yeah, I went there.

Oh, and I have an obsession with pretzel buns. I could definitely save a ton of WW points, and dare I say make this less of a cheat meal – but I was already committed. Something to share with my readers who really want to make a splash at their football watch party or Labor Day cookout this weekend! So, I give you the Whiskey-Glazed Cheeseburger – best paired with an ice cold beer…

Whiskey Glazed Cheeseburger_cookingonthebrightside

Whiskey-Glazed Cheeseburger (Serves 4 – let’s not even discuss points right now)

Inspired by and adapted from HalfBakedHarvest – original recipe here.

For the Burger…

1 pound Laura’s Lean Ground Beef (I went 92% lean this time around)

4 Tbsp. reduced-fat blue cheese crumbles

1/2 tsp. Worcestershire sauce

1/4 tsp. Seasoned salt

1/4 tsp. black pepper

4 slices Kraft singles (I used the 2% milk ones)

Mix together beef with Worcestershire sauce, salt and pepper. Divide into 4 equal portions and make a well in the center of each. Add 1 Tbsp. of blue cheese in the well and form the burger around it, enclosing the cheese in the center of the burger.

FormBurgers_cookingonthebrightside.com

When you’re ready to cook – fire up the grill to medium-high and cook 7-10 minutes on each side until cooked through.

For the Crispy Onions…

1/2 yellow onion, thinly sliced

1/3 cup skim milk

4 Tbsp. white whole-wheat flour

Pinch cayenne pepper, garlic salt and black pepper.

2 tsp. vegetable oil

Add onion slices to milk and soak 10-20 minutes. Add flour and seasonings to large ziploc bag. Remove onion slices, let excess milk drip off, and add to ziploc bag. Toss to coat onions.

Heat oil in a medium skillet. Add onions and saute 3-4 minutes, flip and cook another 3 minutes until both sides are crispy. Keep warm in oven if needed.

For the Whiskey Glaze

1/4 cup whiskey (I used Jack Daniels – representing Tennessee y’all!)

1/4 cup ketchup

2 Tbsp. soy sauce

2 Tbsp. honey

1 1/2 tsp. Dijon mustard

1 1/2 tsp. Worcestershire sauce

1/4 tsp. cayenne pepper

1/4 tsp. black pepper

Whisk ingredients together in a small saucepan, bring to a boil. Reduce and let simmer 5-7 minutes until thickened. Keep warm.

BurgerToppings_cookingonthebrightside

Assembly

Get your burger bun – I found pretzel buns at our local grocery store and deem them winners!

Add your burgers to the center of the bun – which may be slightly larger than the burger (no complaints here!). Spoon glaze evenly over the top of each burger. It’s okay if it seems like there’s a lot – it will run down and start soaking into the bread.

Then add your cheese slices. Then top with the crispy onions. Add the top half of your bun and prepare to say “Mmmmm” a lot. The first 2 bites had me amazed that this creation just came from my kitchen.

TopBurger_cookingonthebrightside

And then I got to the center.

BlueCheeseCenter_cookingonthebrightside

Goodness. I may be making this again this weekend to celebrate a hopeful victory for my team(s). If you give this a try – let me know what you think and if you modified it all, I love hearing how people make recipes their own!

Happy Labor Day weekend y’all – and happy beginning of COLLEGE FOOTBALL SEASON!

Veal Piccata: Lightened Up

Happy 2014 everybody! I hope you all had a fabulous holiday season and enjoyed ringing in the new year…whether you were doing it while “resting your eyes” on the couch or toasting champagne at a fabulous party!

Now, it has come to my attention lately that several people (ahem, my husband) aren’t a fan of the whole New Year’s hype and find the whole ordeal “anti-climatic.” To this I say for shame!

I will be the first to admit, it’s not as big of a priority as it once was for me. Planning out an outfit, making sure I had a big-ticket party to attend, staying out too late, etc. However, I still love getting together with friends to celebrate – whether it’s a big festive gathering or a few of us eating dinner, putting on PJ’s and playing games!

I just love the idea of a fresh start – a new chapter if you will. Some may say if you want to have a goal or if you want to do something, just do it. But honestly, it’s nice having that reset button programmed on my calendar. For me it’s like having a brand new notebook on the first day of school (I am a huge nerd and still get excited over new notepads, pens etc.). It’s clean, it’s new and it’s just waiting to be written on – so what mark will you make on 2014?

One of my major resolutions is to focus on myself. That sounds really selfish when I put it out there like that…but I mean more about my “self”. I ate with reckless abandon over the holidays and putting on work pants this week showed me that I’m definitely paying for it. It’s been a few years since I’ve been to the eye doctor. I have lived our house for about 4 years and still haven’t really put anything up on the walls. I want to make our house a home. I want to stop squinting when I’m driving at night. And I want to shed my holiday weight (plus a few pounds I’ve picked up from the past year) – I want to be content in my own home and in my own skin.

So – there you have it. I’m going to be cracking down on myself, but y’all will get to benefit because I have some cooking to do!

It’s 2014 people. Time to get to it and make some changes…starting with a favorite recipe of mine that has been changed into a delicious, light and healthy dish! You can use this for any special occasion, or just a Saturday night meal with a glass of wine watching a movie. It’s easy. It’s elegant. But best of all it’s not loaded with fat and calories.

Veal Piccata – Lightened Up (WW points / 10 per serving + pasta)

Ingredients for Veal Piccata

2/3 pound veal scallopini (basically the thin cutlets of veal – I find mine pre-packaged at the grocery store)

1/4 cup white whole-wheat flour

Salt and pepper for seasoning

1 Tbsp. canola oil

2 tsp. minced garlic

1/3 cup white wine

1/2 cup fat-free, reduced-sodium chicken broth

1 Tbsp. fresh lemon juice

3 Tbsp. capers

Lemon slices for garnish

Begin by sprinkling veal slices with salt and pepper. Then press into flour, shaking off any excess. Heat oil in a large skillet over medium heat. Add veal cutlets and cook 3-4 minutes per side until cooked through. You may need to work in batches – they do cook down quickly.

Step by Step Veal Piccata

Remove cutlets and set aside. De-glaze pan with white wine and add garlic. Swirl and let heat for about 1 minute. Add butter, allowing it to melt, and then adding chicken broth and capers. Stir and allow to thicken for about 2 minutes, then add in lemon juice, lemon slices and veal. Allow veal to reheat in the sauce for 2-3 minutes and for the sauce to thicken slightly.

Plate veal and pour sauce over top, adding lemon slices for a little visual appeal. I serve this with whole wheat spaghetti (about 1 1/2 oz. uncooked for 2 people) sprayed with a little butter and sprinkled with some garlic salt and reduced-fat Parmesan – making this meal 12 points total. I call that a good way to start off the new year…

Veal Piccata

Have a great weekend y’all!

Baked Tacos

Let’s be honest – there are few things worse than the first day back at the office after a wonderfully relaxing vacation. I mean, other than the first entire week back. Obvi.

Apologies for my lack of updates – after a fun-filled wedding weekend in Chicago, I was in full on survival-mode with vacation on the brain! The husband and I spent 8 days in South Carolina with my parents, enjoying all that Lake Keowee had to offer! We ate good food, drank good wine, watched movies (it rained a few days), played some tennis, hiked to a beautiful waterfall, soaked up sunshine when we could, read some books, and just had an overall amazing time.

SC WaterfallsLake Keowee South Carolina

Thanks to my parents for putting up with us for a week!

Anyways – aside from that first day catching up on e-mails and curling up in fetal position under your desk when you look at your completed to-do list, the other quite miserable thing  is the kitchen.

Like, why didn’t somebody stock my fridge for my return? Seriously, going to the grocery store can be exhausting when you’ve just spend 8 1/2 hours in a car singing along to the 80’s and 90’s XM stations at the top of your lungs much to the delight dismay of your husband.

Luckily, I had a few items to throw together one of our of new-found favorite meals which was perfect for our “Meatless Monday”. The husband always loves taco night, but this way is so easy because everything is ready at once and the filling doesn’t fall out everywhere!  Honestly, this one is a bit surprising for 2 reasons:

1 – My hubby loves it even when I use the “fake meat”

2 – I love it even though it has re-fried beans, which I usually make the hubby scoop out of the can because they gross me out so much.

So, if anything in this recipe doesn’t sound quite up your ally, just give it a try – I bet you’ll be pleasantly surprised!

Baked Tacos (Serves 2 / 10 pts. per serving)

Ingredients

6 Whole Grain Taco Shells (I use Ortega)

1 1/3 cup MorningStar Farms Meal Starters Veggie Crumbles (or ground turkey/chicken/beef of your choice, will affect WW point values)

1/4 cup chopped yellow onion

2 oz. canned tomato sauce

4 oz. fat-free re-fried beans

4 tsp. Taco seasoning (we use the “Hot and Spicy” mix – yum!)

2 oz. chopped green chiles, canned

1/2 cup reduced-fat shredded cheddar cheese

Toppings of your choice (salsa, lettuce, avocado, olives, sour cream, etc. – adjust point values accordingly!)

Preheat oven to 350. Add taco shells to a lightly greased baking pan so that shells are upright.

Heat a skillet to medium heat and add non-stick spray. Add veggie crumbles and cook 2-3 minutes, then add onions. Cook another 2-3 minutes before adding tomato sauce, chiles, re-fried beans and taco seasoning. Cook another 5 minutes over medium-low heat, stirring to combine and heat through.

Step by Step Tacos

Bake taco shells 2-3 minutes. Remove from oven and distribute the meat(less) mixture evenly in the shells, pressing down to the edges. Distribute the cheese evenly on top of the mixture. Return pan to oven and bake 10-12 minutes until cheese has melted and shells are baked.

Plated

Add toppings of your choice and devour. I usually go with salsa, lettuce, black olives and avocado – but I’m sure anything will be delicious…

Baked Tacos

Hope y’all have a great weekend!

Bistro Steak with Red Wine Sauce

If you haven’t noticed a theme the past few weeks from my blog – things have been crazy around here. At least, during the week. Hence the cheese fries and casseroles.

Nothing wrong with those foods, because, you know, they’re delicious. But sometimes it’s nice to have a special meal. You know, slow down the pace, sip on a glass of wine, not have to rush off anywhere or get the laundry folded?

I was grabbing some quick groceries at Target the other week and came across some “Laura’s Lean Beef” organic sirloin steaks. They were a pretty good price (about $6.00 – think what you’d pay at a restaurant!) and were vacuum sealed in their own juices so they looked super tender.

So I tested out this recipe and the verdict was: it’s pretty darn delicious! I’ve been known to scramble around a little when it’s time to eat, but this one is pretty simple with some prep work done ahead of time. I recommend an easy starch like rice or potatoes to soak up some of the delicious sauce…that’s just a necessity.

I must say, if time preparing a meal is not a luxury you have, but the time to savor one sounds like pure bliss – you should definitely give this one a try!

Bistro Steak with Red Wine Sauce (Serves 2 / 10 pts. per serving)

Ingredients

2 (6 oz.) sirloin steaks, trimmed of fat

1/2 Tbsp. canola oil

2 Tbsp. shallot, chopped

2 tsp. ground thyme

4 fl. oz. red wine

1/2 cup fat-free beef broth

1 tsp. Dijon mustard

1/2 Tbsp. dried parsley

1/2 tsp. salt

1/2 tsp. black pepper

1 Tbsp. butter

Heat oil in medium skillet over medium-high heat. Sprinkle steaks with 1/4 tsp. salt and pepper. Cook steaks in oil for 4-5 minutes on each side. Remove from heat and let rest 5 minutes.

Steak Collage

Saute shallots and thyme in remaining oil for 1 minute before adding wine. Cook 2-3 minutes until majority of liquid evaporates. Add beef broth and cook 5 minutes until liquid thickens and reduces by half. Whisk in remaining salt and pepper, and add butter and mustard.

Slice steak into strips across the grain and top with sauce. Sprinkle with parsley and serve…

Plated Steak


And don’t forget something to soak up all of that delicious sauce…

Bistro Steak

Hope y’all have a great weekend!

French Onion Style Salisbury Steak

Confession: I am like a little kid on Christmas morning when my magazines arrive in the mail each month.

They all usually come within a few days of each other, so I try to save them all up so I can scour the pages for tips on gardening (psh, right), decorating (eh, okay), shopping (heck yes) and of course, cooking (woot woot!).

So in addition to my Southern Living, Cooking Light, Food Network and Veranda magazines (don’t judge), I got a bonus one this month – and it’s full of recipes!

Okay, full is a bit of an exaggeration as it’s not a full-fledged 90-pager, but has anybody else received Cuisine at Home?

Well, I went ahead and sampled a recipe for y’all…slimming it down of course, because bathing suit season is upon us! I’ve even started a new workout program…if it doesn’t kill me, it is certainly going to make me stronger.

Now, I’ve never made or eaten salisbury steak, so I’m not sure what drew me into this particular recipe – but after eating it, it’s totally on the “make again” list. Hope you enjoy as much as we did!

French Onion Style Salisbury Steak (Serves 2 / 10 WW pts. per serving)

Ingredients

Adapted from original recipe here.

8 oz. ground beef (points based on 93% lean)

1/2 Tbsp. dried parsley

1 Tbsp. chopped scallions

1/2 tsp. kosher salt

1/4 tsp. black pepper

3/4 Tbsp. white whole wheat flour (+ 1/2 tsp. for later)

1/2 Tbsp. olive oil

1 cup yellow onion, sliced

1/2 tsp. sugar

1/2 Tbsp. minced garlic

1/2 Tbsp. tomato paste

1/2 tsp. dried thyme

1 cup beef broth

2 Tbsp. red wine

4 slices french baguette (I use the Target brand “Archer Farms” petite baguette

1 slice reduced-fat swiss cheese

2 Tbsp. shredded Parmesan cheese

“I Can’t Believe It’s Not Butter” spray

Heat oven to 350.

Begin by combining your ground beef, scallions, parsley, salt and pepper together. Form into to small patties. Dredge in flour.

Heat olive oil in a medium skillet. Add patties to skillet and saute over medium for 3-4 minutes on each side. Remove patties. Add onions and sugar to skillet and cook 4-5 minutes until tender. Stir in garlic and tomato paste and sprinkle with 1/2 tsp. flour. Add broth, wine and thyme and a little dash of salt. Stir until blended well. Return patties to the pan, reduce heat to medium low. Cover and simmer for 10 minutes until patties are cooked through.

Assembly

While the patties are cooking, get your cheese bread ready. Place baguettes on a baking sheet, spray with butter and sprinkle with garlic salt. Tear up swiss cheese slice and place on each slice, and sprinkle evenly with Parmesan. Bake 7-9 minutes until toast is crispy and cheese is melted.

Cheese

Add 2 slices of bread to a plate. Place a cooked Salisbury steak on top. Pour onion sauce mixture over each and serve.

FrenchOnionSalisburySteak

I served this with a side of mashed potatoes to soak up sauce and it was an excellent decision!

CloseupSalisburySteak

Hope y’all have a great weekend!

Asian Steak and Bok Choy Salad

So lately I feel like we’ve been so busy that I’ve had no time to go the store. Which means we’ve gone out to eat or ordered take-out a bit too frequently for my taste. It’s just hard for me to be “good” when I go out – I’m like, oh, that salad sounds lovely but I’ll have the bacon-cheeseburger with crispy onions and a side of fries please.

Well, I FINALLY made it to the store the other night and just needed a little something light but filling for a good dinner! I had been craving some Chinese food – so I whipped something up with a lil Asian flair and boy was it delicious! I had never used bok choy before, but it actually wasn’t so scary!

Try this for light dinner or a fabulous lunch!

Asian Steak and Bok Choy Salad (serves 2 / 10 WW pts. per serving)

8 oz. trimmed flank steak

1 bunch bok choy

2 tsp. olive oil

1 Tbsp. peanut oil

2 tsp. minced garlic

1 Tbsp. pickled ginger, minced

2 tsp. sugar

1 tsp. sesame oil

2 1/2 Tbsp. soy sauce

1 Tbsp. lemon juice

Salt and pepper to taste

1/2 Tbsp. sesame seeds

1 medium green onion, chopped

Heat olive oil in a large skillet on medium-high heat.

Salt and pepper your steak on both sides and add to skillet. Cook 7 minutes on each side (ended up about medium in the center – reduce time 2 minutes for medium-rare) and remove from heat. Cover with foil to keep warm.

In the same skillet, heat 1/2 Tbsp. peanut oil. Add bok choy – I ended up only using about 3/4 of the bunch. I layered mine in the skillet and played the rotation game, cooking each piece for about 5 minutes. The leaves should be wilted and the lighter part should soften slightly. It has the same texture of celery – so you want it to stay slightly firm and crunchy!

Remove bok choy and add to your plate.

Now, heat the other 1/2 Tbsp. peanut oil. Add your ginger and garlic and saute for 30-45 seconds.

Reduce heat to medium and add soy sauce, lemon juice, sesame oil and sugar. Whisk to dissolve sugar and bring to a low simmer until slightly thickened. Remove from heat.

Take your steak out of the foil and slice, against the grain, into thin strips.

Lay steak on top of bok choy and drizzle with the dressing.

Top with sesame seeds and green onion.

Now it’s time to dig in – and it’s so “light” on points for a dinner that you don’t have to feel guilty about pairing it with a nice glass of wine!

Hope y’all enjoy this – please let me know if you try anything on my blog by leaving a comment on that recipe – I’d love to hear from you!


Cheese Steak Pizza

It’s time for another edition of “Faux Bar Food Friday!” Get excited. No really, are you excited yet?

I’m sure a lot of people will be gathering at their local watering hole for a cold beverage (or 2 – hey, I don’t judge) this weekend for one of several reasons:

A) It’s the weekend. Duh.

B) St. Patrick’s Day. Green beer. Good luck. And kissing for various reasons, like being Irish. Kiss me, I cook. Pucker up hubby! 😉

C) Um, March Madness? (Go Tigers Go!)

D) Spring Break ending or beginning. In which case I hate you because you still have spring break. Not really…more like I’m really jealous.

E) All of the above. Which really makes me miss my last spring break…a week during which a small group of my fellow classmates were surprisingly studious, but still managed to forge some great friendships over classwork, college basketball and cold beer. Ah, the good ol’ days.

I digress.

Regardless of which category you fall into – and even if you decide to hang out in the comfort of your own home – you gotta eat, right?

So I think you should make a delicious and very filling pizza. Because I care about you. And because well, it’s just so darn good! We’ve surpassed the traditional sauce and pepperoni pizza. I throw on steak sauce. And, um, steak. And vegetables – because they make this “healthy”. And of course, cheese. Even my cheese-loathing sister might approve of this recipe.

Do yourself a favor and make plans to throw this one together. There are many things you might regret while enjoying spring break, St. Patty’s or hours of watching basketball in a bar…but at least this recipe is one thing you can look back on with pride.

Cheese Steak Pizza (serves 2)

Pizza Crust

3/4 cup white whole-wheat flour

1/2 Tbsp. olive oil

1/2 Tbsp. honey

1 tsp. salt

1/4 cup warm water

1/2 tsp. dry active yeast

Mix together flour and salt in a medium bowl. Pour warm water in a small bowl. Add olive oil, yeast and honey and whisk with a fork. Let sit 7-10 minutes until “foamy.” Add liquid to flour and mix until combined. Cover and let rest in a warm area to rise, usually 1-2 hours.

Cheese Steak Topping

6 oz. tenderized cube steak (it has the “lines” in it)

1 1/2 Tbsp. Worcestershire sauce

1/4 tsp. salt

1/4 tsp. black pepper

1 bell pepper, sliced

1/2 small onion, sliced

Steak Sauce (I used A1)

5 slices reduced-fat Provolone cheese

1/2 cup fat-free mozzarella cheese, shredded

Preheat oven to 400 degrees.

Heat your skillet to medium and add Worcestershire sauce. Slice your steak along the lines.

Add steak to hot skillet with salt and pepper. Cook 2-3 minutes and flip.

Add your sliced bell peppers and onions. Saute with steak for 5-7 minutes until vegetables are tender and steak is cooked through.

Roll out your pizza dough and stretch out onto a lightly greased pan.

Add 4 tablespoons of steak sauce and use a spoon to spread out evenly on the pizza crust. (I also sprayed my crust with a little olive oil and sprinkled with garlic salt before adding the sauce.)

Then, add your steak and vegetables.

Take your slices of provolone cheese and arrange on top, covering as much surface area as you can.

Fill in the gaps with your shredded mozzarella.

Cook pizza for 15-20 minutes until crust is crispy and cheese has melted.

Slice, serve and enjoy! It’s the weekend after all, and we all have a reason to celebrate!

Happy Friday everybody!