Garlic Bread Spaghetti Braid

It has totally been one of those weeks when the kitchen and I have not been seeing eye to eye.

I think it all started when I set out to share my delicious recipe for kale chips with y’all. I got some awesome pictures, so while I was plating the main course, I stuck the baking sheet back in the oven.

Which I had turned off of broil 5 minutes before.Turns out, I don’t like my kale chips well done. They went in the garbage.

Then, the other night, I decided to try a super-awesome looking recipe off of my mere amusement obsession Pinterest. You can see the original recipe here.

Now, it ended up turning out okay – I just wasn’t patient enough. People – when a recipe says let the dough thaw…you should probably let it thaw. I’m pretty sure I almost chucked the dough on the floor, but I did not – I held my tantrum to throwing it on the counter and smacking it with a rolling-pin. Very mature for an almost no longer 20-something, right?

Anyways, it all turned out to be okay – so I’m very happy I get to share this recipe with you! I  made a few adjustments before and will make some additional ones the next time I prepare it, but no worries – I’ve included both below!

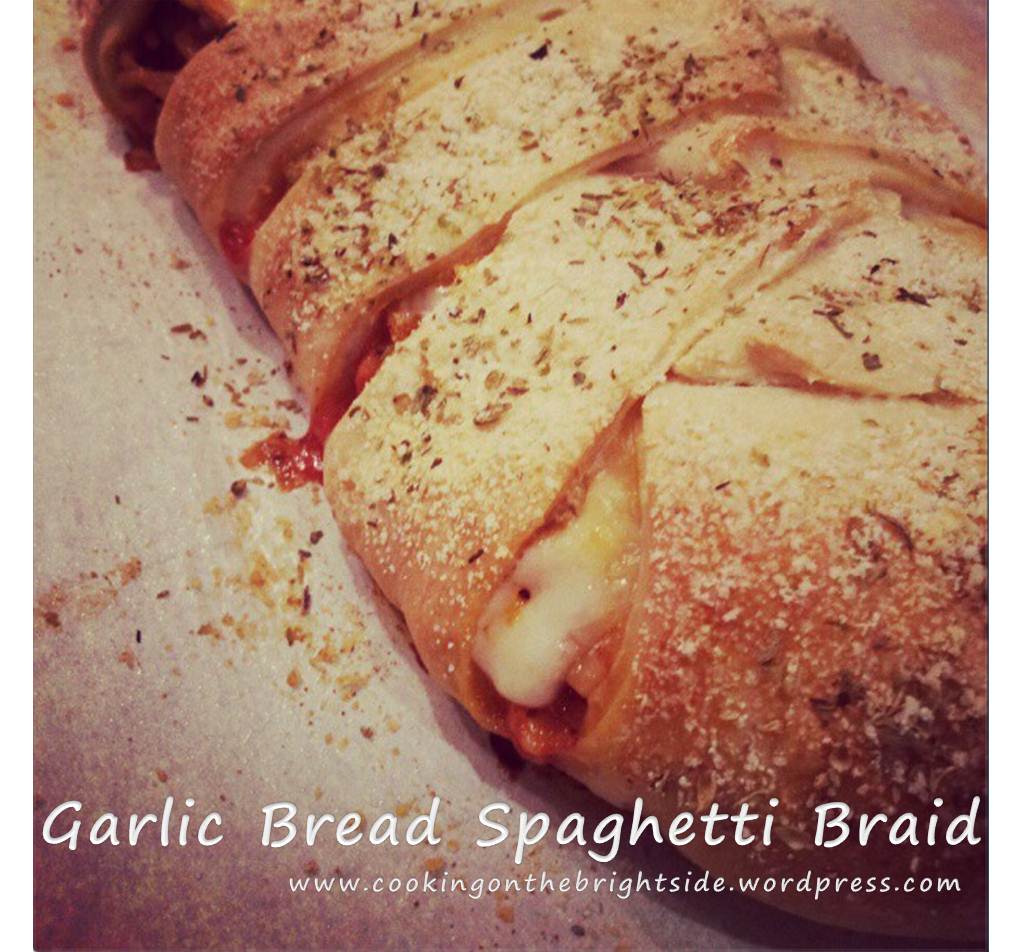
Garlic Bread Spaghetti Braid  (Serves 4 / 9 WW Points per serving)

Ingredients

1 can Pillsbury Crusty French Loaf refrigerated dough, room temperature

3 oz. uncooked whole wheat spaghetti

1 cup Prego light

1 cup reduced-fat shredded Mozzarella

1/2 egg white

2 tsp. garlic salt

1/4 tsp. red pepper flakes

1/2 tsp. salt

2 Tbsp. Italian herb seasoning

2 Tbsp. reduced-fat grated Parmesan cheese

I Can’t Believe It’s Not Butter spray

Begin by thawing your dough. Just set it out 15-20 minutes before you start cooking. Seriously. If it’s cold, it won’t stretch and every time you roll it out, it’ll try to shrink back to original form. And you will want to hit things.

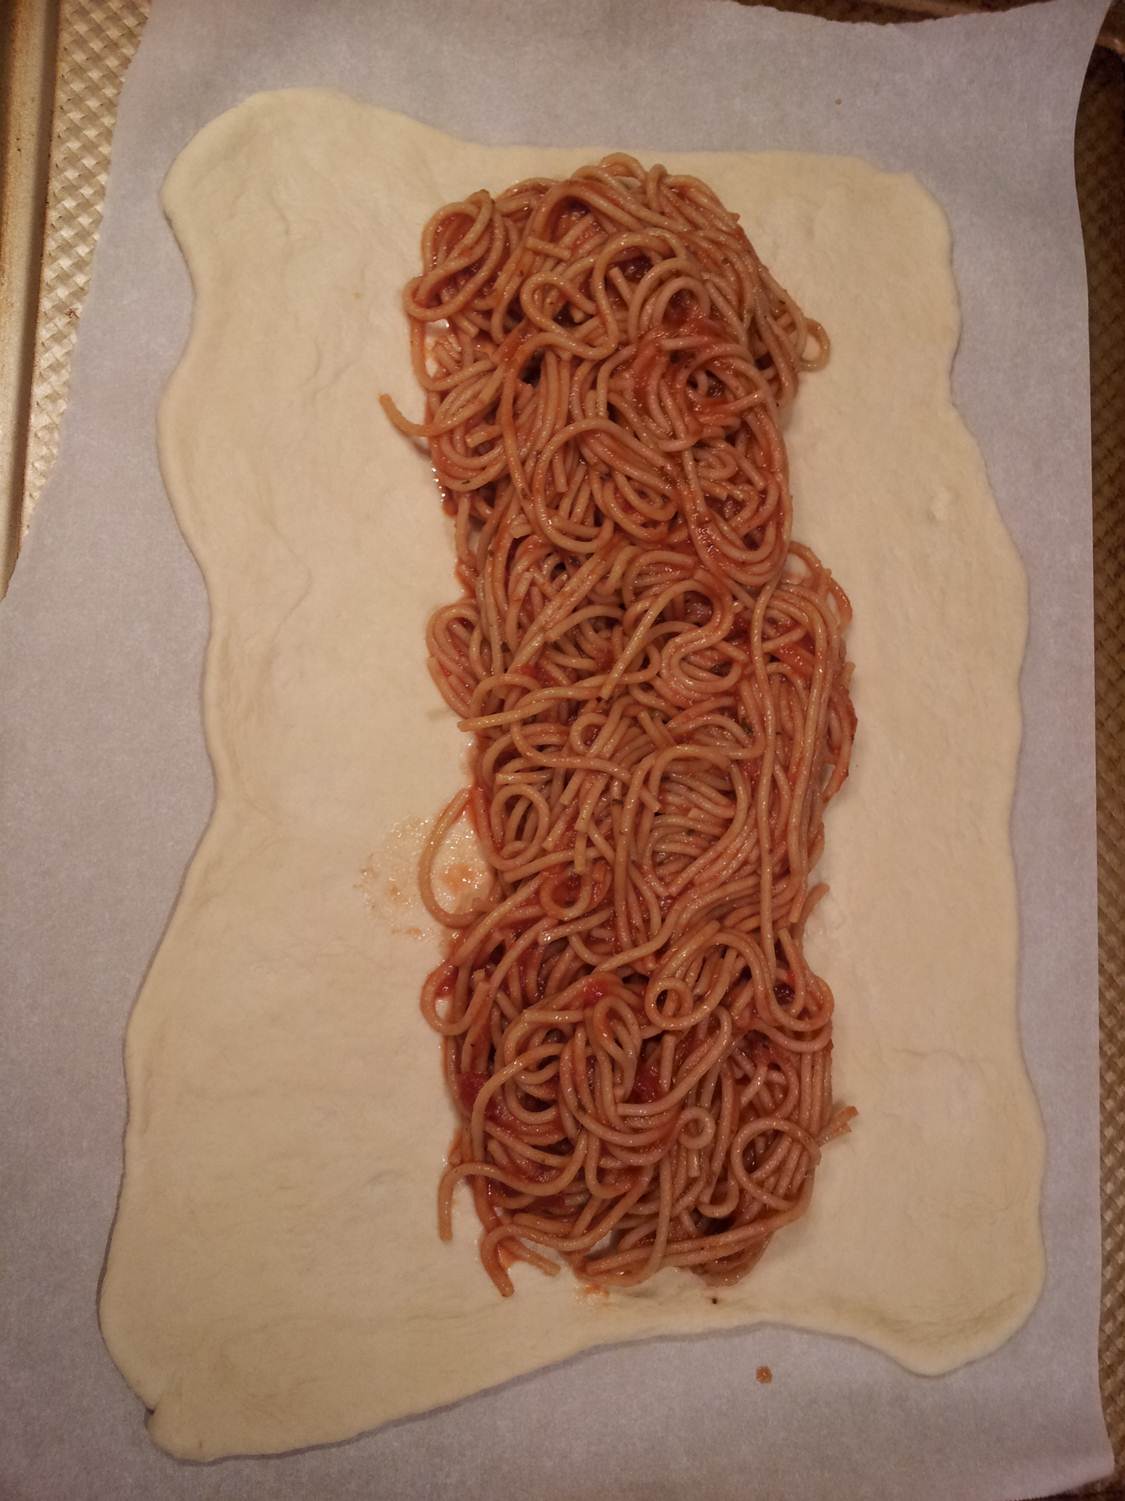
Get your water boiling and cook your spaghetti. While the spaghetti is cooking, work your dough out into as much of a rectangle as you can.

Dough

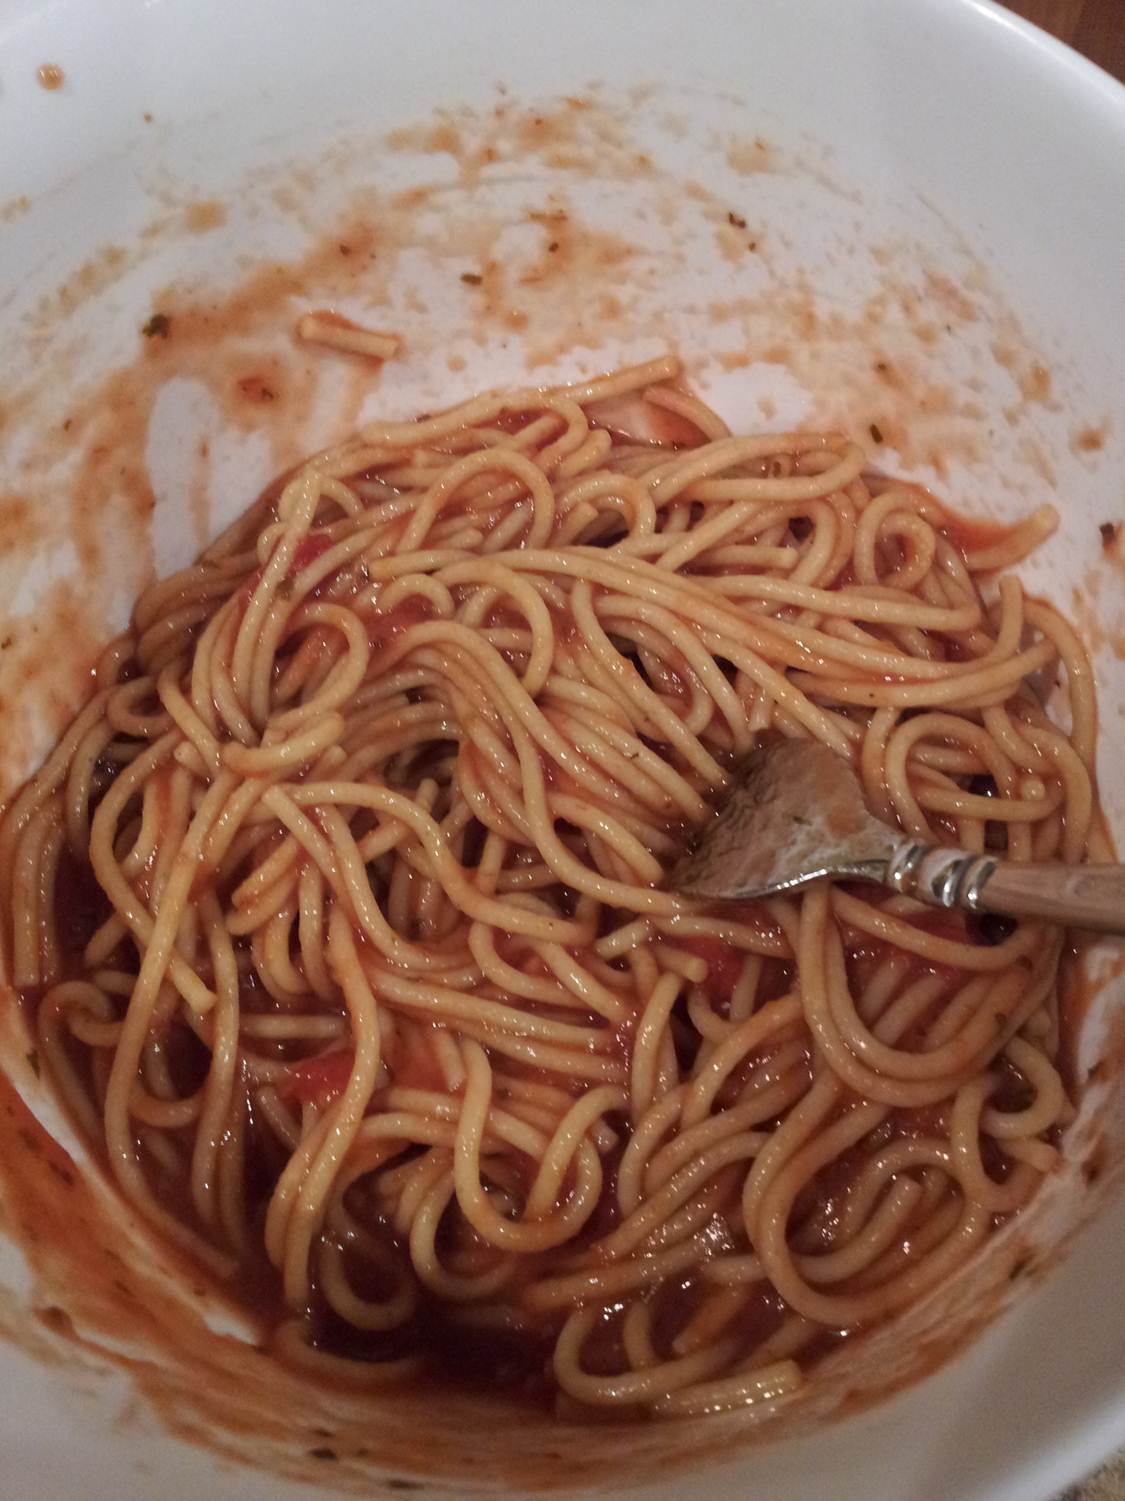
Drain your cooked pasta and add to a small bowl. Let cool.

Pour pasta sauce in another small bowl. I highly recommend adding a lot of seasoning to the light sauces – as I find them to be watery and a little sweet for my taste. Throw in 1 tsp. garlic salt, red pepper flakes, 1 Tbsp. Italian herb seasoning and taste to see if the flavor is improved. I made the mistake of not taking these steps and so the inside was a little bland – we had to doctor it up as we ate!

Pour sauce over pasta and mix well.

Mix with Sauce

Add pasta to the center of your dough, leaving a little room at the ends. Sprinkle the mozzarella on top.

Add PastaCheese

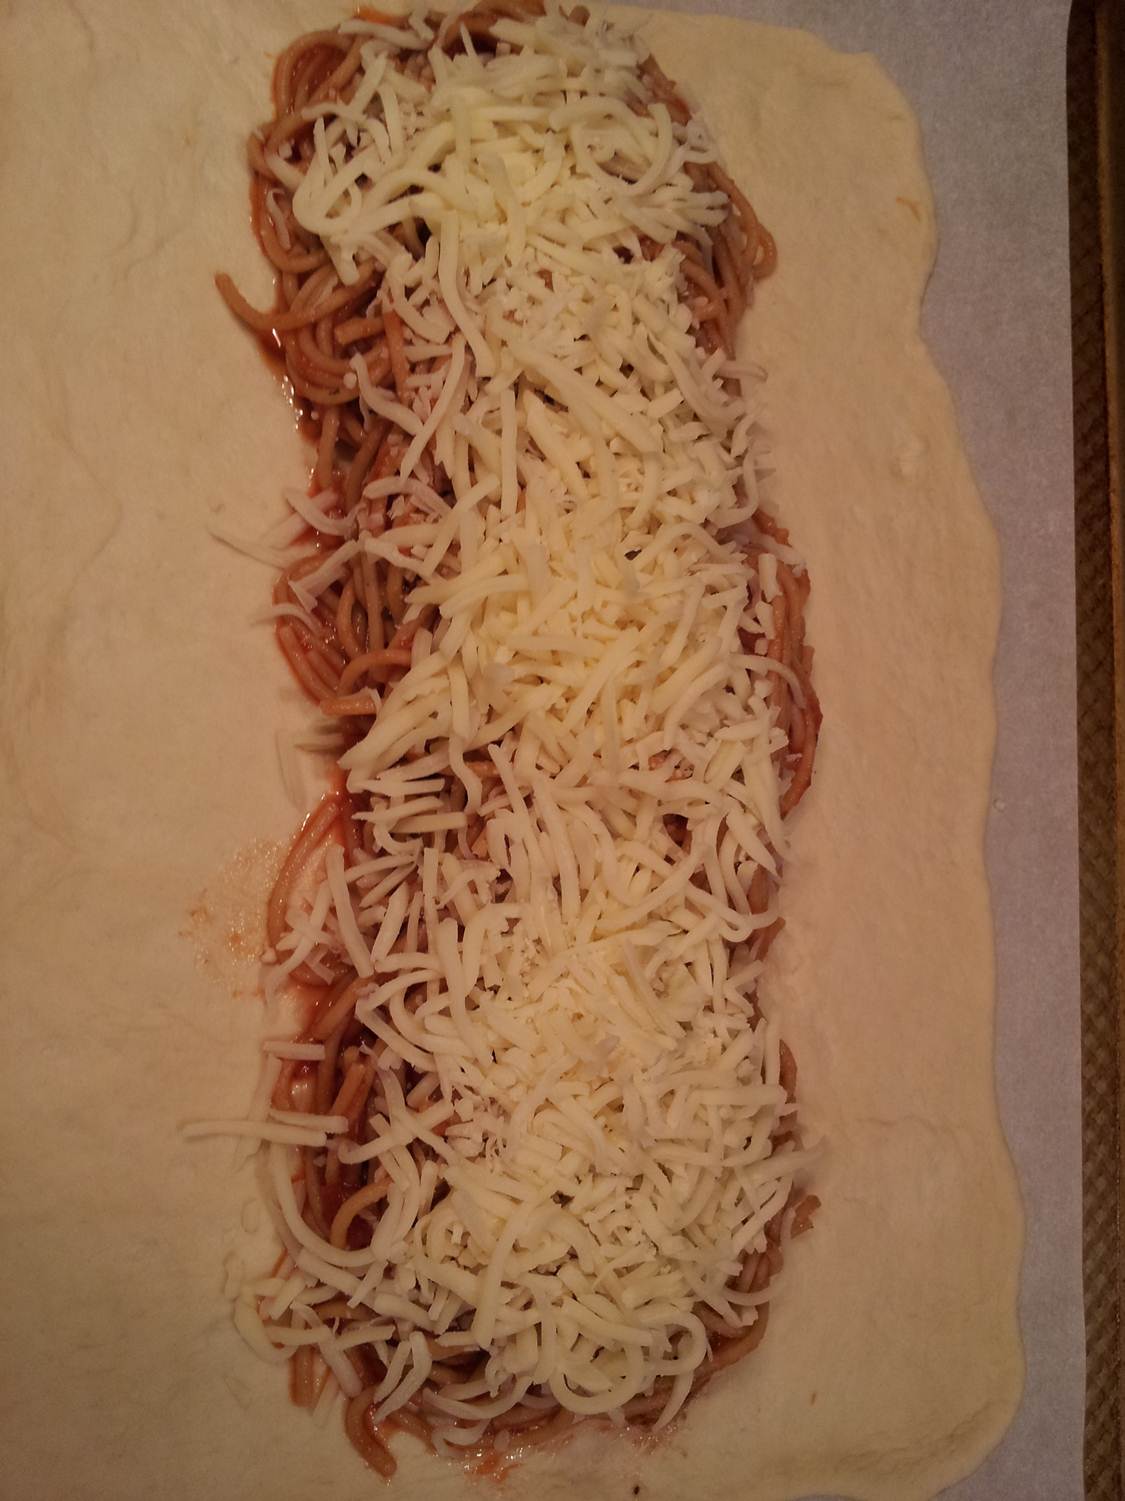
Now, on one side of your dough, make slices every 1 1/2 inches or so that run almost to the spaghetti. Repeat on other side, trying to match up the slices. Then, begin braiding. It’s really just  a matter of overlapping the pieces until they look right. Then tuck up the ends and pinch together.

Unbaked Braid

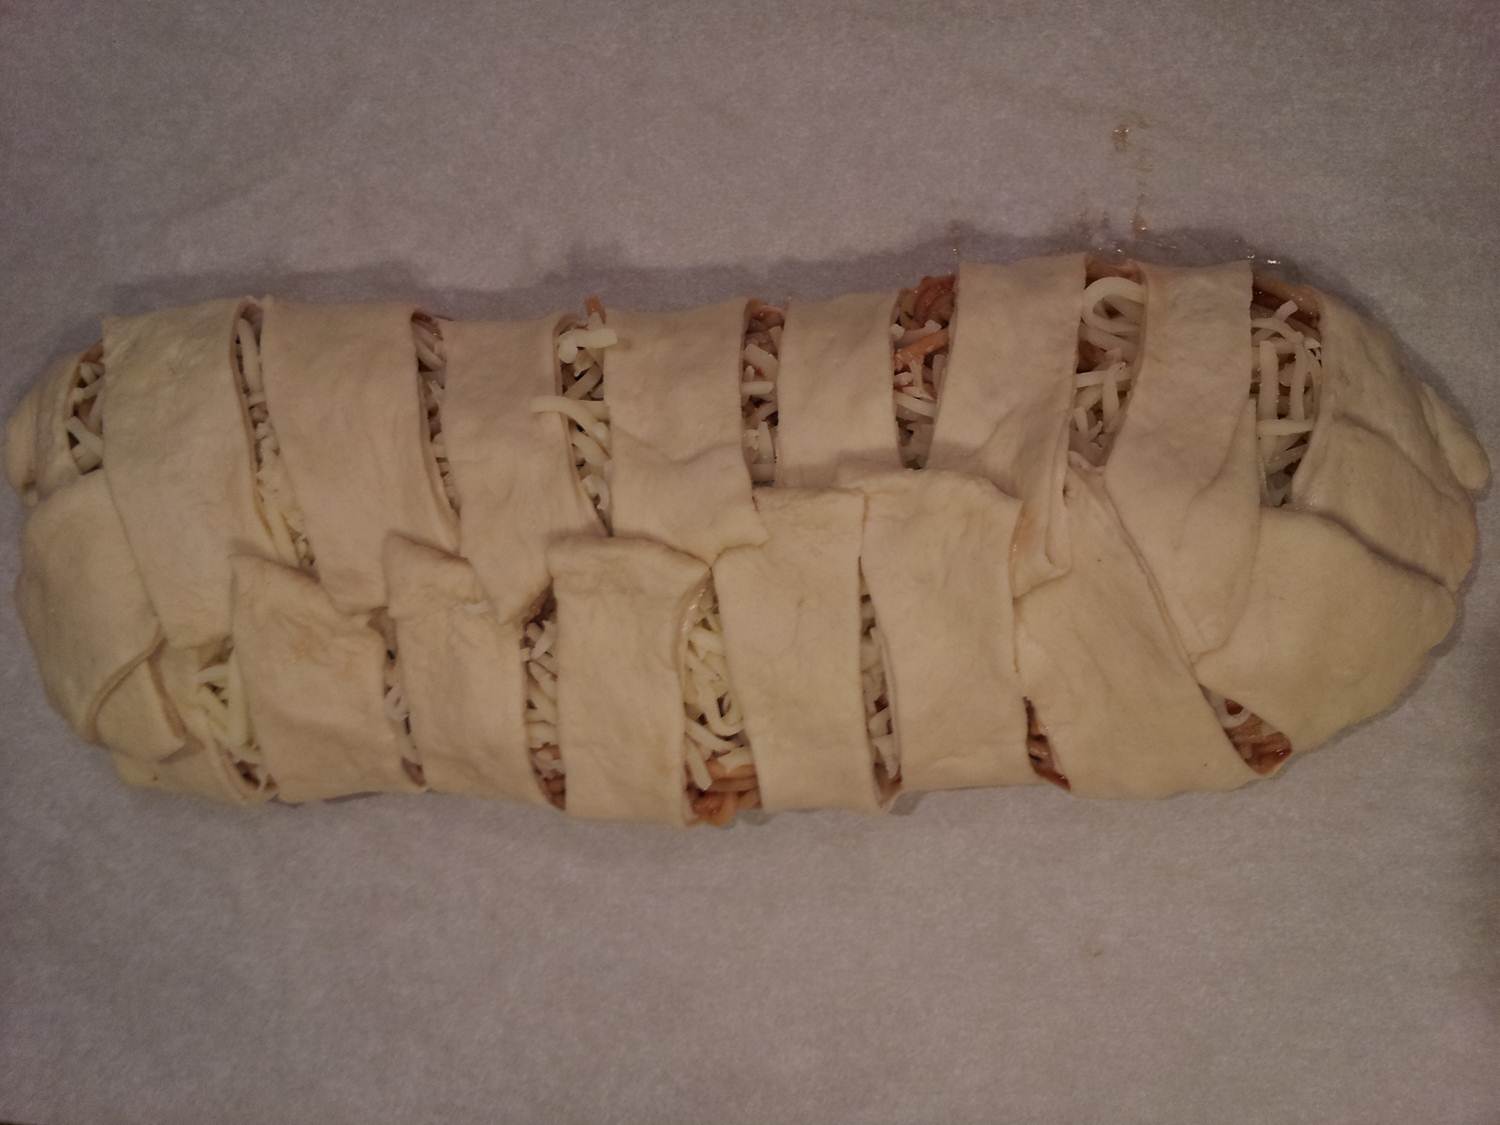
Brush a little egg white on top of the braid. Then spray with butter. Sprinkle with garlic salt, Italian seasoning and Parmesan cheese.

Seasoning

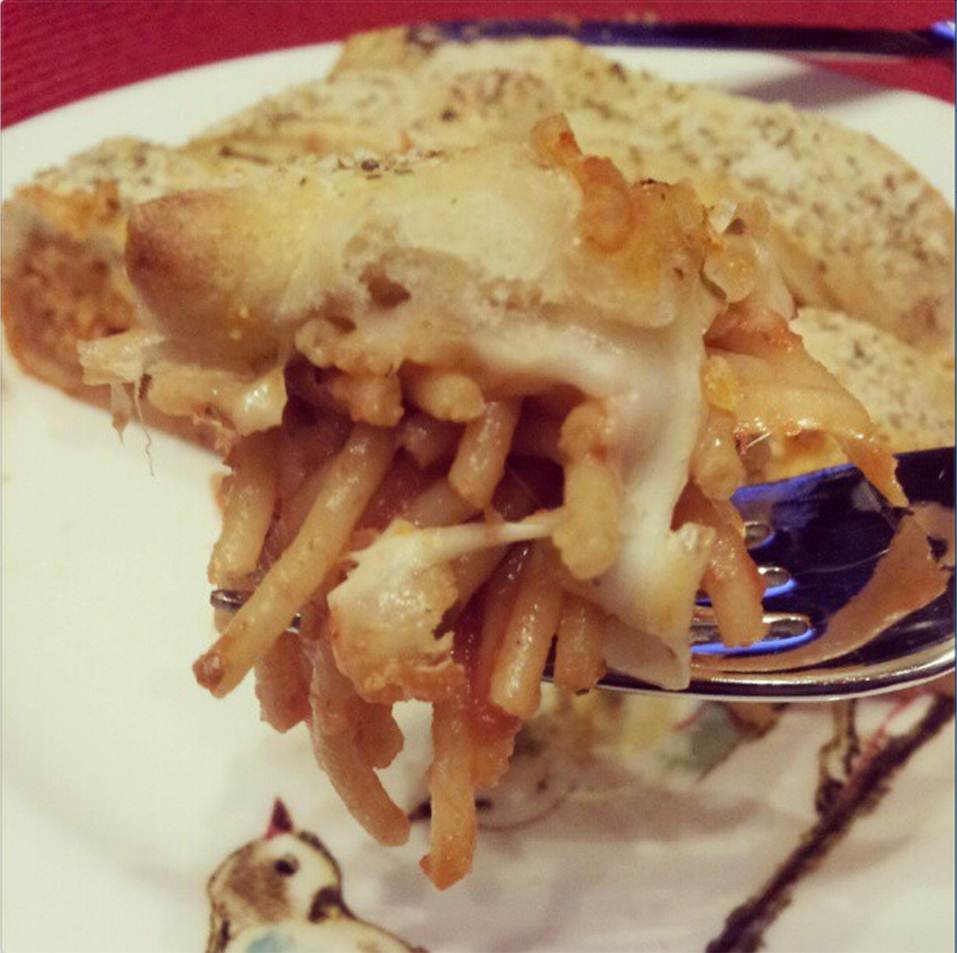
Bake at 350 for 30-35 minutes until bread is cooked and a nice golden color on top. I served this with a salad and glass of wine for a nice, light dinner. It’s really pretty simple to make – and it looks awesome! I think it would be great to throw together if you’re entertaining…

InsideInstagram - Bite

Or to have all to yourself on a cold, rainy evening…

Garlic Bread Spaghetti Braid

Roasted Vegetable Strudel

So this week, I’ve been determined to get into the Christmas spirit. The 70 degree weather makes it incredibly difficult. I want gloves and scarves and pea coats people! I shouldn’t have to crank the AC down to convince myself it’s cool enough for a hot chocolate, right?

Last weekend, we got our tree. Which is beautiful. It’s also giant – so halfway through putting up lights, we had to run out and buy more. This was after spending the afternoon balancing on a ladder hanging giant ornaments and outdoor lights, so we postponed the actual decorating of the tree until the next night…because I wanted to be able to enjoy decorating, which comes complete with an ornament draft and a viewing of Love Actually.

Ornaments Tree

Now, we’re entering the portion of the month full of holiday parties. I think they are fun on the weekends – but let me tell you, during the week – they can just be exhausting! As in, I get home and don’t want to move. Or cook.

Luckily, I have a great recipe that’s pretty easy to prepare. It’s filling, but not as rich as that cheese ball or creamy dip your co-workers make – and it’s the perfect way to load up on your veggies this holiday season. Don’t be intimidated by the point value – it’s great as a big dinner, or you can divvy it up for snacks!

Roasted Vegetable Strudel (serves 2 / 14 WW points per serving)

Ingredients

1 medium eggplant, chopped

1 medium zucchini, chopped

1 red bell pepper, sliced

1 small red onion, sliced

1/2 package frozen artichoke hearts

1 1/2 tsp. minced garlic

2 tsp. olive oil

“I Can’t Believe It’s Not Butter” spray

10 tsp. reduced-fat Parmesan cheese, grated

1 cup shredded fat-free mozzarella cheese

2 oz. Goat cheese crumbles

10 sheets Phyllo Pastry Sheets

Salt and pepper

2 tsp. Italian herb seasoning

1/2 cup marinara sauce for dipping

Preheat oven to 425. In a deep baking pan, toss vegetables with olive oil, garlic and a few dashes of salt and cracked black pepper. Roast for 25-30 minutes.

Seasoned veggies

While your vegetables are roasting, it’s time to play with Phyllo! Get a sheet of wax paper or aluminum foil and spray with a little non-stick spray (the sheets tend to stick the longer they sit!).

You will need 5 sheets of phyllo for each strudel. Lay your first one down and spray with butter and sprinkle with grated Parmesan. Repeat with each layer. When you get to the final layer, add crumbled goat cheese and shredded mozzarella about 2/3 of the way down the sheet, leaving a 1 inch border on the sides and end.

Phyllo layer Cheeses

When your vegetables are cooked through, add to the top of the cheese. Also reduce oven temperature to 400. (You will probably have some leftover vegetables – they are great for a leftover lunch served with a little crunchy bread!)

Roasted Veggies

Starting from the end with the cheese and vegetables, begin to roll your strudel. This is where you will be glad you used a little non-stick spray! Place strudel seam side down on a lightly greased baking sheet. Spray tops with a little more butter, sprinkle with additional Parmesan and add some Italian herb seasoning. Bake for 15-20 minutes until pastry is lightly browned.

Rolled Baked

Slice and serve with marinara sauce for dipping.

inside

Seriously, why can’t all vegetables look this delicious?

Close Up Bite

Mustard Glazed Rack of Lamb

In case you haven’t quite figured it out, tomorrow is Thanksgiving! A time to hang out with family, stuff your face with turkey, stuffing, dressing, potatoes, casseroles, cranberry sauce and olives.

Oh, and I’m sure there will be pie. Just to make sure any extra room in your belly doesn’t have a prayer of staying that way!

It’s easy to get caught up in the hustle and bustle of Thanksgiving – but as I’ve gotten older wiser, I’ve realized that there’s so much more to this time of year than food, food, time off work and leftover food. It’s about sitting back and taking it all in and realizing how good we have it. I am so fortunate and blessed and for some reason, I constantly find myself taking it all for granted. So as I curl up with one of my parents dogs on the couch tomorrow, eyelids fighting to see that beautiful RG3 touchdown to secure a win over the Cowboys, I will rest with a thankful and full heart, knowing that God has truly blessed me and my family.

Now, switching gears a little (but still counting my blessings!) today is a special day because 4 years ago on this very day – I went on my very last first date!

How crazy that walking into that restaurant, a bundle of nerves in a red peacoat, that I was meeting my future husband. We didn’t even eat dinner because we were both so nervous!

I am amazed each day at how perfect he is for me and I am so blessed to have found my better half, to have had a beautiful wedding surrounded by the love of our friends and family, and to know that whatever the future holds, we’re in it together.

You may recall that we recently celebrated our one-year anniversary and that I was preparing a special meal. Well, today, since we’re counting our blessings (and clearly NOT our calories this weekend) – I figured I’d share our celebratory dinner with you!

So now you can be thankful that I’m shutting up and moving on to the good stuff…

Mustard Glazed Rack of Lamb (Serves 2-3)

1 1/2 pound lamb rack, trimmed (your butcher will trim if it’s not already done!)

1/4 cup Dijon mustard

1 Tbsp. soy sauce

1/2 Tbsp. olive oil

1 tsp. dried rosemary

1 tsp. minced garlic

1 tsp. black pepper

In a small bowl, add your mustard, soy sauce, olive oil, rosemary, garlic and black pepper. Whisk until blended.


Now, using a silicon brush, spread the sauce over your lamb. Preheat oven to 400.

Allow lamb to marinate 30 minutes. Remove 10-15 minutes prior to cooking to bring to room temperature.

Place lamb, rib side down, in a roasting pan (might want some non-stick spray or some excess sauce will bake on!) and cook 30-40 minutes or until thermometer registers 130-140 (this is medium rare – medium is 140-150). Remove and cover with foil. Lamb will continue cooking, so anticipate temperature to go up another 5 degrees while resting.

If your glaze starts to brown like mine did, cover the pan with foil. I was a little distracted setting the table for our first fancy meal with all of our fine china and crystal – yay!

To cut the lamb, make sure you have a sharp serrated knife. Hold the rack by the bone and cut down into the meat. You’ll often have to crack the bone – so you might need to saw a little until it gives,

Slices into chops and plate. I find lamb to have such a rich flavor that usually 3 chops is plenty – especially when paired with a little brown butter risotto and roasted brussel sprouts!

So if you’re looking for a meal for a special occasion, I definitely recommend lamb! I was terrified the first time I made it, but it is seriously easy and allows you time to work on the side dishes while it’s marinating and cooking!

We were also fortunate enough to have some delicious butter pecan wedding cake for dessert – it was surprisingly good for having lived in a cardboard box and foil in the depths of our freezer for a year.

I hope you all have a wonderful and Happy Thanksgiving, whether you’re staying in a house full of people and devouring a 20 pound turkey or ordering pizza and watching the Friends marathon on TBS (in which case I might be a little jealous), remember to take a little time to reflect on all of the blessings in your life!

Buffalo Chicken Potato Skins

I have a serious issue.

I mean beyond my fear of balloons (also known as “globophobia” – which means I am not alone!). And okay, I’m also overlooking the rage incited within me when somebody confuses the words “flavor” and “scent.” Yeah, let that one marinate for a minute..it’s maddening!

The issue I’m talking about is my love for all things buffalo-flavored.

You’d think I would have fun out of buffalo inspired recipes by now. You, my dear friend, would be wrong.

I also have an obsession with potato skins. I love potatoes in pretty much every form – but roasted until crispy and topped with cheese and bacon? Right, no words needed.

Clearly, not exactly the healthiest of choices – but in my defense, I usually order this “appetizer” as a main meal. I’ll be debating my selection and the husband will look up from his menu and be like “You’re ordering potato skins aren’t you?” Yes, over that delicious famous local burger or yummy spicy hot wings. Over hot wings people – that speaks volumes, does it not?

Well, I have finally found a way to combine my two loves – and the best part is that this recipe is healthy for either a main meal or a snack! It’s the perfect thing to enjoy while watching college football this weekend – or to snack on next week when you’re burnt out on turkey!

Buffalo Chicken Potato Skins (2 WW pts. per skin with 1/2 Tbsp. Ranch dressing)

6 small russet potatoes

8 oz. raw chicken breast

1/4 cup chopped celery

1/3 cup Frank’s Red Hot sauce

6 Tbsp. reduced-fat blue cheese crumbles

1/2 cup shredded fat-free mozzarella

1 Tbsp. Hidden Valley Ranch Mix

6 Tbsp. fat-free Ranch dressing

Salt and pepper

Olive oil spray

Preheat your oven to 450.

Slice all of your potatoes in half. This will give you 12 halves. See? Math is fun!

Now scoop out the insides of your potatoes, leaving about 1/4 inch border to hold your filling and well, allow you to taste the potato. I used a melon baller to scoop since the potatoes are still raw.

Spray both sides of your potatoes with olive oil. Sprinkle both sides with salt and pepper. I sprinkled a little Ranch seasoning on the inside to give it a little extra boost of flavor – yum! Place skins on a lightly greased baking sheet and bake for 15-20 minutes until the potato flesh is tender and the skins are slightly crispy.

While the potatoes are cooking, bring a pot of water to a boil and add your chicken. When chicken is cooked (8-10 minutes is good) let chicken cool slightly and shred with 2 forks. Add about 2-3 Tbsp. hot sauce and mix well.

When your potato skins are cooked, remove from the oven and begin to assemble!

Add your shredded chicken and celery. Then add about 1/2 Tbsp. each of blue cheese crumbles and shredded mozzarella.

Return to oven for 5-7 minutes until cheese has melted.

Remove and drizzle remaining 2-3 Tbsp. hot sauce on potato skins. I also sprinkled with some dried chives due to lack of green onion, but that’s up to you!

Serve with some fat-free Ranch dressing for dipping and devour!

Try them while you’re rooting on your team this weekend…you won’t regret it!

Decision 2012 – What’s for Dinner?

I feel like there’s something big going on today…anybody else?

That’s right – it’s Election Day! I remember 4 years ago was my first time to actually vote at a poll location (the previous election I was in college out-of-state!) and there is just something about standing in line and voting in person that makes you feel proud to be a part of a process that makes our country great.

(I also remember 4 years ago texting back and forth with “some guy” as we were watching the results come in. At least we know how that one turned out, right?)

So today, my friends, presents you with a decision to make: What’s for dinner?

Okay, so maybe you have another decision to make today! But if you’re going to be standing in line after work or glued to the coverage on TV, the last thing you want is to be stuck in the kitchen. You need something quick!

Pizza! No, put the phone down. Just make your own – your waistline will thank you!

Recently, we had our first garage sale and I knew I’d be crazy busy and knew we needed a quick dinner the night before. On my grocery run, I ran across Canadian bacon and immediately had a craving for a Hawaiian pizza. Just something about the little bit of sweet from the pineapple combined with the salty, smoky flavor from the cheese and meat…yum! This pizza totally gets my vote! (I’m sorry, you know me – I couldn’t resist!)

Now, for the steps below I made my own wheat dough, which you can find the recipe for here – but if you want to make this a super quick meal like I did before the garage sale, just grab a pack of naan (an Indian flat bread) from your local grocery store. It’s the perfect size for a personal pizza! I like the Stonefire Whole Grain Naan when I don’t have time to make my own dough!

Homemade Hawaiian Pizza (serves 2 / 13 pts. per pizza)

1 batch wheat dough (or your favorite store-bought – make sure to adjust the points!)

1/4 cup Ragu pizza sauce

1/2 cup pineapple tidbits in juice, drained

1 cup reduced-fat shredded Mozzarella cheese (I was out of fat-free – if you use it, the points per pizza drops to 11 pts. per pizza!)

4 slices Canadian bacon, cut into small pieces

Olive oil spray

Garlic salt

Heat your oven to 375. Have your dough/prepared crust on a baking sheet. Spray lightly with olive oil and sprinkle with garlic salt.Next, add your pizza sauce – spreading out in a thin layer with a spoon.

Then, take your pineapple tidbits and arrange them evenly over your pizza(s). I like to make sure I’ll get a piece in almost every bite – buuut I’m also a freak. At least I own it.

Now, sprinkle your cheese on top of your pineapple.

Then add your Canadian bacon – again, arranging evenly over your pizza(s). We decided we liked this on the top instead of under the cheese so gets some direct heat!

Bake for 12-15 minutes (depending on the crust you use). I also let ours sit under the broiler for a minute or two to get good coloring on the cheese (ours maybe went a few seconds too long but there was a kitchen emergency as somebody spilled coffee granules EVERYWHERE!).

Now it’s time for the 3 S’s – Slice. Serve. Shove in your face.

So go stand in line and cast your vote today – cause you know dinner is taken care of!

Chicken Cordon Bleu Casserole

Yes, you read that correctly. Chickenfriggincordonbleu – in. A. Casserole!

To be quite honest, I’d never had chicken cordon bleu until I made a skinny version a few months back. However, the whole pounding the chicken thin, rolling it and securing it usually puts me into a fit of rage and kills a bunch of toothpicks. Sometimes it’s worth it – as you saw with my Jalapeno Popper Chicken!

However, sometimes – life just calls for a casserole. And with the chill in the air, you’ll love this layered comfort food – but you know I have your back, so it’s lightened up as to not add layers to YOU!

Chicken Cordon Bleu Casserole(serves 4 – 8ww pts/serving)

2 cups cooked chicken, shredded

4 oz. lean sliced deli honey ham

2 oz. reduced-fat Swiss cheese

2 Tbsp. reduced-calorie margarine

2 Tbsp. white whole-wheat flour

1 3/4 cups skim milk

1 Tbsp. lemon juice

1 Tbsp. Dijon mustard

3/4 tsp. salt

1/2 tsp. smoked paprika

1/8 tsp. white pepper

3/4 cup panko breadcrumbs

2 tsp. dried parsley

1/4 tsp. Seasoned salt

“I Can’t Believe It’s Not Buttter” spray

Preheat oven to 350 degrees and spray medium casserole dish with nonstick spray.

In a medium saucepan, add butter and milk over medium heat and whisk until melted. Add flour and whisk until smooth. Bring to a light simmer and stir until thickened.

Then add lemon juice, mustard, salt, white pepper and paprika. Bring back to light simmer and remove from heat.

Now, take your shredded chicken and spread in the bottom of your casserole dish.

Chop your ham and shred your cheese. Spread ham over the top of the chicken, then spread cheese evenly over the top.

Pour sauce over the cheese and spread, ensuring it reaches the edges.

Sprinkle panko crumbs evenly over the top of the casserole, dusting with parsley and seasoned salt. Spray with butter spray.

Now bake uncovered for 45 minutes until browned and bubbly. Remove from oven and let rest 5 minutes before serving.

This dish is so low in points, you can serve with a delicious crisp salad and a slice of whole wheat bread to soak up the goodness.

Hope y’all enjoy…I know we sure did!

Asian Steak and Bok Choy Salad

So lately I feel like we’ve been so busy that I’ve had no time to go the store. Which means we’ve gone out to eat or ordered take-out a bit too frequently for my taste. It’s just hard for me to be “good” when I go out – I’m like, oh, that salad sounds lovely but I’ll have the bacon-cheeseburger with crispy onions and a side of fries please.

Well, I FINALLY made it to the store the other night and just needed a little something light but filling for a good dinner! I had been craving some Chinese food – so I whipped something up with a lil Asian flair and boy was it delicious! I had never used bok choy before, but it actually wasn’t so scary!

Try this for light dinner or a fabulous lunch!

Asian Steak and Bok Choy Salad (serves 2 / 10 WW pts. per serving)

8 oz. trimmed flank steak

1 bunch bok choy

2 tsp. olive oil

1 Tbsp. peanut oil

2 tsp. minced garlic

1 Tbsp. pickled ginger, minced

2 tsp. sugar

1 tsp. sesame oil

2 1/2 Tbsp. soy sauce

1 Tbsp. lemon juice

Salt and pepper to taste

1/2 Tbsp. sesame seeds

1 medium green onion, chopped

Heat olive oil in a large skillet on medium-high heat.

Salt and pepper your steak on both sides and add to skillet. Cook 7 minutes on each side (ended up about medium in the center – reduce time 2 minutes for medium-rare) and remove from heat. Cover with foil to keep warm.

In the same skillet, heat 1/2 Tbsp. peanut oil. Add bok choy – I ended up only using about 3/4 of the bunch. I layered mine in the skillet and played the rotation game, cooking each piece for about 5 minutes. The leaves should be wilted and the lighter part should soften slightly. It has the same texture of celery – so you want it to stay slightly firm and crunchy!

Remove bok choy and add to your plate.

Now, heat the other 1/2 Tbsp. peanut oil. Add your ginger and garlic and saute for 30-45 seconds.

Reduce heat to medium and add soy sauce, lemon juice, sesame oil and sugar. Whisk to dissolve sugar and bring to a low simmer until slightly thickened. Remove from heat.

Take your steak out of the foil and slice, against the grain, into thin strips.

Lay steak on top of bok choy and drizzle with the dressing.

Top with sesame seeds and green onion.

Now it’s time to dig in – and it’s so “light” on points for a dinner that you don’t have to feel guilty about pairing it with a nice glass of wine!

Hope y’all enjoy this – please let me know if you try anything on my blog by leaving a comment on that recipe – I’d love to hear from you!


Special Occasions

Today is a very special occasion in my household.

One year ago today, on a beautiful Fall day in Memphis, I put on my white dress and my red shoes and married my best friend. It was truly an amazing day from spending the morning with my parents, the afternoon with my favorite ladies, the evening with my husband – and the later hours with our dear friends and family.

Cheers to 1 year and to many more! Love you babe!


And then of course ditching everybody to spend a week basking in the sunshine and drinking margaritas on the beaches of Mexico! Hee hee.

Well, in honor of a special day – I thought I’d share a recipe that my husband loves. I’m making a special meal for us tonight – but the hubby recently requested this dish, so I decided to be a good wife and oblige. And okay, I think it’s pretty delicious too! I ran across this one on one of my favorite blogs.

Clams Casino Pizza (Adapted from “How Sweet Eats”)

Crust

3/4 cup white whole-wheat flour

1/2 tsp. yeast

1/8 tsp. salt

1/4 cup warm water

1/2 Tbsp. olive oil

1/2 Tbsp. honey

Pizza Toppings

4 slices turkey bacon, cooked and crumbled

1/2 Tbsp. olive oil

1 small red onion, chopped

1 green bell pepper, chopped

1 red bell pepper, chopped

2 tsp. minced garlic

2 tsp. Italian seasoning

A few dollops of Tabasco (we like it spicy people – I’d say we rocked 10-12 shakes)

8 ounces fat-free mozzarella cheese

1/3 cup reduced-fat parmesan cheese

2 cans of minced clams, drained

In a small bowl, add warm water, yeast, honey and olive oil. Mix and let sit 3-5 minutes. Add flour to a medium bowl with salt. Add liquid to flour and mix well until combined. Knead  2 minutes, cover and let sit 1-2 hours to let dough rise.

When dough has risen, spread out on a lightly floured surface and form into a circle.

While dough is rising, chop your vegetables. Preheat your oven to 375.

Heat olive oil in a medium skillet over medium heat. Add your vegetables and saute 5-7 minutes. Add in your garlic and your hot sauce. Then add your clams and half of the crumbled bacon and cook for 3-4 minutes. Remove from heat and prepare to assemble your pizza.

Brush pizza dough with olive oil. I added a few shakes of garlic along with my Italian seasoning.

Sprinkle half of the mozzarella on the dough. Top with the vegetable/clam mixture.

Then add Parmesan and remaining mozzarella.

Bake for 25-30 minutes, removing after 10 minutes to top with remaining bacon.

Serve and devour – I know we certainly do! A great twist on a favorite food of ours that super easy to make.

Hope you all enjoy – now I’m gonna go whip up a deliciously sinful feast for the hubby and I that we’ll chase down with year-old wedding cake! (Hopefully better than it sounds!)


Artichoke and Parmesan Grouper

I realize it’s September, which is “Fall” for some people. I love every single thing about Fall (minus the back-to-school traffic of course). College football is back people! The weather is perfect – I’m a boots, jeans and chunky sweaters kind of gal! Time for bonfires. Beautiful colors. I love my cinnamon and apple candles. Oh, and hello, it means I can start breaking out soups and making chili again!

However, despite Starbucks trying to convince me it’s Fall with the offering of their Pumpkin Spice Lattes, I am not fooled people! Here in Memphis, we are still having days where the heat index is over 100.

Ridiculous, right?

So as long as it still feels like summer, I figure why not make the best of it. I’ve told y’all many times how much fresh seafood reminds me of trips to the coast with my family, so I have an amazing grouper recipe that seriously transports me to the beautiful white beaches!

Now I got the seafood right around the corner at a place called “Paradise Seafood” – which I finally know the name of since I finally got my behind there myself! It’s where my parents have been going for a few months now. Remember that delicious Triggerfish recipe I shared with you? Yeah, that’s the place. But this time, I picked up some massive fillets of grouper. The husband and I made 4 meals out of 2 fillets because they were that huge!

So whether it’s Summer or Fall where you are, I have a feeling you’ll enjoy this either way – especially because it’s very weight watchers friendly!

Artichoke and Parmesan Grouper (serves 4 / 5 points per serving)

24 oz. grouper fillets (can be 2 large cut in half or just 4 small)

2 Tbsp. fresh lemon juice

1 1/2 Tbsp. fat-free mayonnaise

1/4 cup reduced-fat grated parmesan cheese

1/4 cup quartered artichoke hearts

2 Tbsp. reduced-calorie margarine, softened (I use Blue Bonnet Light)

1 tsp. Tabasco (this is just enough spice but still mild – adjust accordingly)

1/4 tsp. salt

1/4 tsp. black pepper

4 additional lemon wedges (for serving)

Preheat oven to low broil.

Chop artichokes into small pieces. Add to a small bowl with mayonnaise, Parmesan cheese, margarine, salt, pepper and Tabasco. Mix until blended.

Place your fillets in a lightly greased, oven-safe dish and arrange so they all lay flat. Brush all fillets with lemon juice and sprinkle with a little salt and pepper.

Add grouper to oven and cook on low broil for 5-7 minutes. Grouper should flake lightly with a fork.

Remove grouper and spread evenly with Parmesan mixture, creating a thin layer over the entire surface.

Return to the oven and broil another 3-4 minutes until the coating is lightly browned and bubbly.

Serve with a glass of chilled white wine, kick back and enjoy whatever weather you are experiencing!

Buffa-faux Chicken Tenders

Let’s flash back to the year 2010 for a moment, shall we?

– New Orleans won the Super Bowl

– The Oil Spill

– The Winter Olympics in Vancouver

– Auburn won the BCS National Championship

Now, somewhere in there, I decided to do WW to shed some pounds that desperately needed to go. But like I’ve said before, I love my food. I didn’t want to give up things I love because I knew that would make me an angry person. Deny me a burger and fries? I might punch you in the face.

But I learned quickly that by limiting portions and well, “bad” stuff like, well, almost anything fried – I could make it! So I started making turkey burgers with baked fries. Greasy calorie laden pizza? I made my own crust and used smarter toppings and reduced fat cheese.

Buffalo wings? Oh buffalo wings, how I love thee. Now I will say that sometimes, I still just need the real thing. But in 2010 I did find a way to make some delicious buffalo chicken tenders that are baked and also incredibly filling if you eat 4-5 of them. Definitely fond of the year 2010 – discovered baked buffalo wings. Oh, and got engaged. It was a good year.

So anyways, I know one of the ingredients sounds a little crazy, but it’s actually pretty delicious. You should totally try it.

Buffa-Faux Chicken Tenders (serves 2 – 11 WW pts. per serving)

10 chicken tenders

1/2 cup reduced-fat buttermilk (Doesn’t all really “count” since you end up pouring out the excess)

1 tsp. Tabasco

1/2 tsp. minced garlic

1 1/2 cups ground Fiber One cereal

1 tsp. onion powder

1 tsp. garlic salt

1/2 tsp. smoked paprika

1/2 tsp. salt

1/3 cup Frank’s Red Hot Sauce

1 Tbsp. reduced-calorie margarine

1/2 Tbsp. honey

Olive oil spray

In a medium bowl or deep dish, pour in buttermilk and whisk with Tabasco and garlic. Add trimmed chicken tenders and let soak at least 1 hour. Best if they have 2+ to really marinate!

Grind your cereal and set in a large shallow dish. Add your onion powder, garlic salt, paprika and salt. Mix until well combined.

Preheat your oven to 400. Line a cookie sheet with foil and place a baking rack on top. Spray rack with non-stick spray. This isn’t necessary, but it allows the chicken to get a little crispier.

Have your chicken, coating and baking rack set up in an assembly line and begin!

Pick up chicken and let excess buttermilk drip. Place in the dish with the crumb mixture.

Toss, roll, and press the mixture into the chicken. Then place on your baking rack. Repeat with remaining chicken. Spray the chicken with a little olive oil to crisp it up.

Bake for 10-12 minutes, then remove from oven, flip chicken, and bake another 10-12 minutes until cooked through.

While chicken is baking, add your hot sauce and margarine to a small saucepan and head over medium-low heat. Whisk until blended. I added about 1/2 Tbsp. honey to cut the heat a little!

When your chicken is cooked, add to a plate and drizzle hot sauce over the tenders. It absorbs quickly – but it is quite delicious!

And this, my friends, is what really got me hooked on playing with recipes to make them healthy but still allowing me to eat my favorite foods…great when paired with my ranch flavored oven-baked fries!

Happy Friday everybody!